Introduction
This article was originally written to describe how to configure transbrake control into the Sniper EFI System. However, most of the information is directly applicable to Terminator X so we invite those owners to use this as well.
We received an amazing positive response to our recent article on Configuring and Wiring Sniper EFI System for Nitrous Oxide. But many readers wanted to know how to setup their Sniper EFI System to control both Nitrous and a trans-brake. Here you go! I won't cover any of the details on setting up the transmission itself to perform trans-brake launches--that is beyond the scope of this article. But I will try to cover everything else that you need to be successful with this. I will not repeat the information in the original nitrous configuration article so you will want to take some time to read it if you've not already..
System Overview
The system we will be specifying in this article will be adding control for a trans-brake solenoid by eliminating the secondary enable (momentary) switch we used in the nitrous configuration example. That secondary enable was a bit overkill and really only done to show more of the range of nitrous control capabilities within the Sniper EFI System.
In reality you can just as effectively control the nitrous via the TPS position, which was also done. So in the original example we had three levels of activation control (Nitrous Master Enable Switch, Nitrous Secondary Enable (momentary) Switch, and TPS position greater than 90%.) This example will only use two, freeing up an input for our trans-brake trigger.
Components Used In This Example
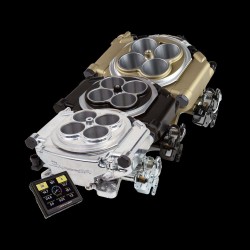
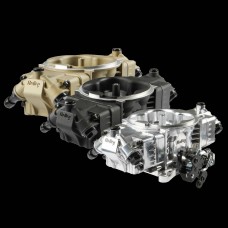
- Sniper EFI System. Any of the Sniper EFI Systems currently available can be used, from the Sniper 2300 2BBL EFI System on up. This could just as easily be implemented on any other Holley EFI System, since the configuration software is similar.
- Sniper EFI-Controlled Ignition System. My recommendation is to go with the HyperSpark distributor, but any of the ignition control methods that can be implementing on the Sniper EFI System will work. (Read my article on that subject.)
- Basic Wet Nitrous System. We will not specify all the details of the system for this example. A nitrous solenoid capable of flow-control via modulation in the 10-20 Hz range is required to provide progressive nitrous application.
- SPST Toggle Switch: This will be used as the nitrous system's master arming switch. It would normally be mounted on the dashboard or some similar location where the actions involved in driving the vehicle could not accidentally enable or disable it. DelCity.Com has a broad selection of switches like this, as would any local electronics shop.
- SPST Momentary Switch: This would normally be mounted on the shifter or steering wheel. It must be mounted where it can be held in the on position during the entire time that the trans-brake is engaged. Releasing this switch will release the trans-brake, launching the vehicle in first gear. Like the SPST Toggle Switch these can be found at a local electronics supply store or at DelCity.Com
- TWO High Current Solenoid Drivers: In addition to the high current driver we used in the original example to drive our nitrous solenoids, a second driver must be used to protect the ECU from the flyback current that is generated when the transbrake is released. The same NOS 15620NOS Solid State Relays can be used to drive the nitrous or the trans-brake solenoid (but you need one for each.).
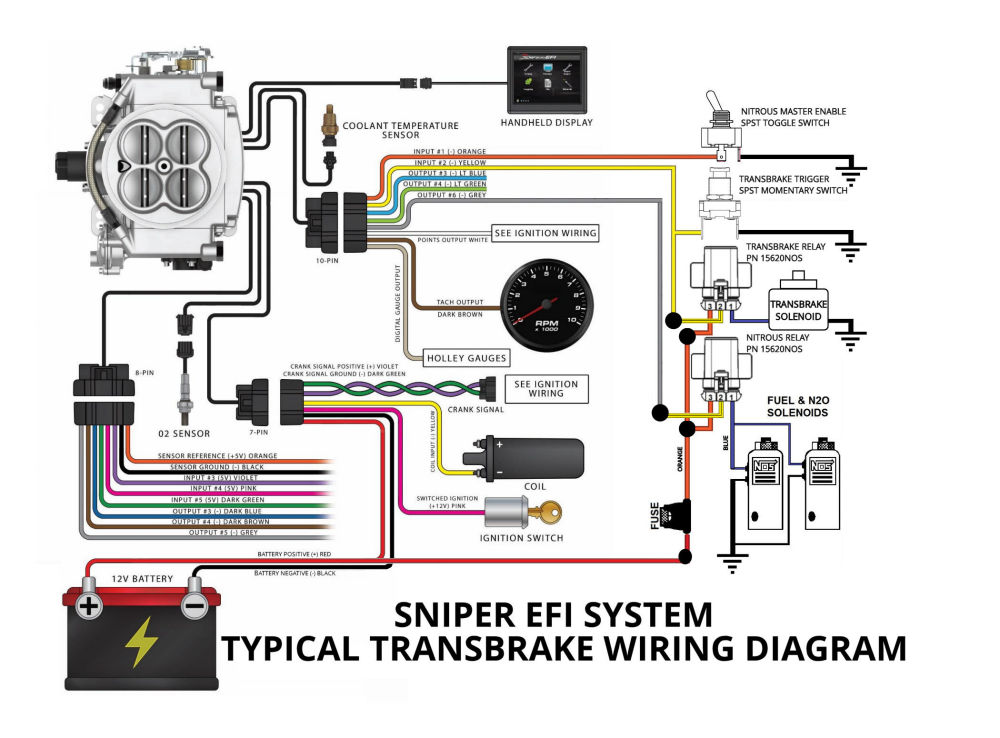
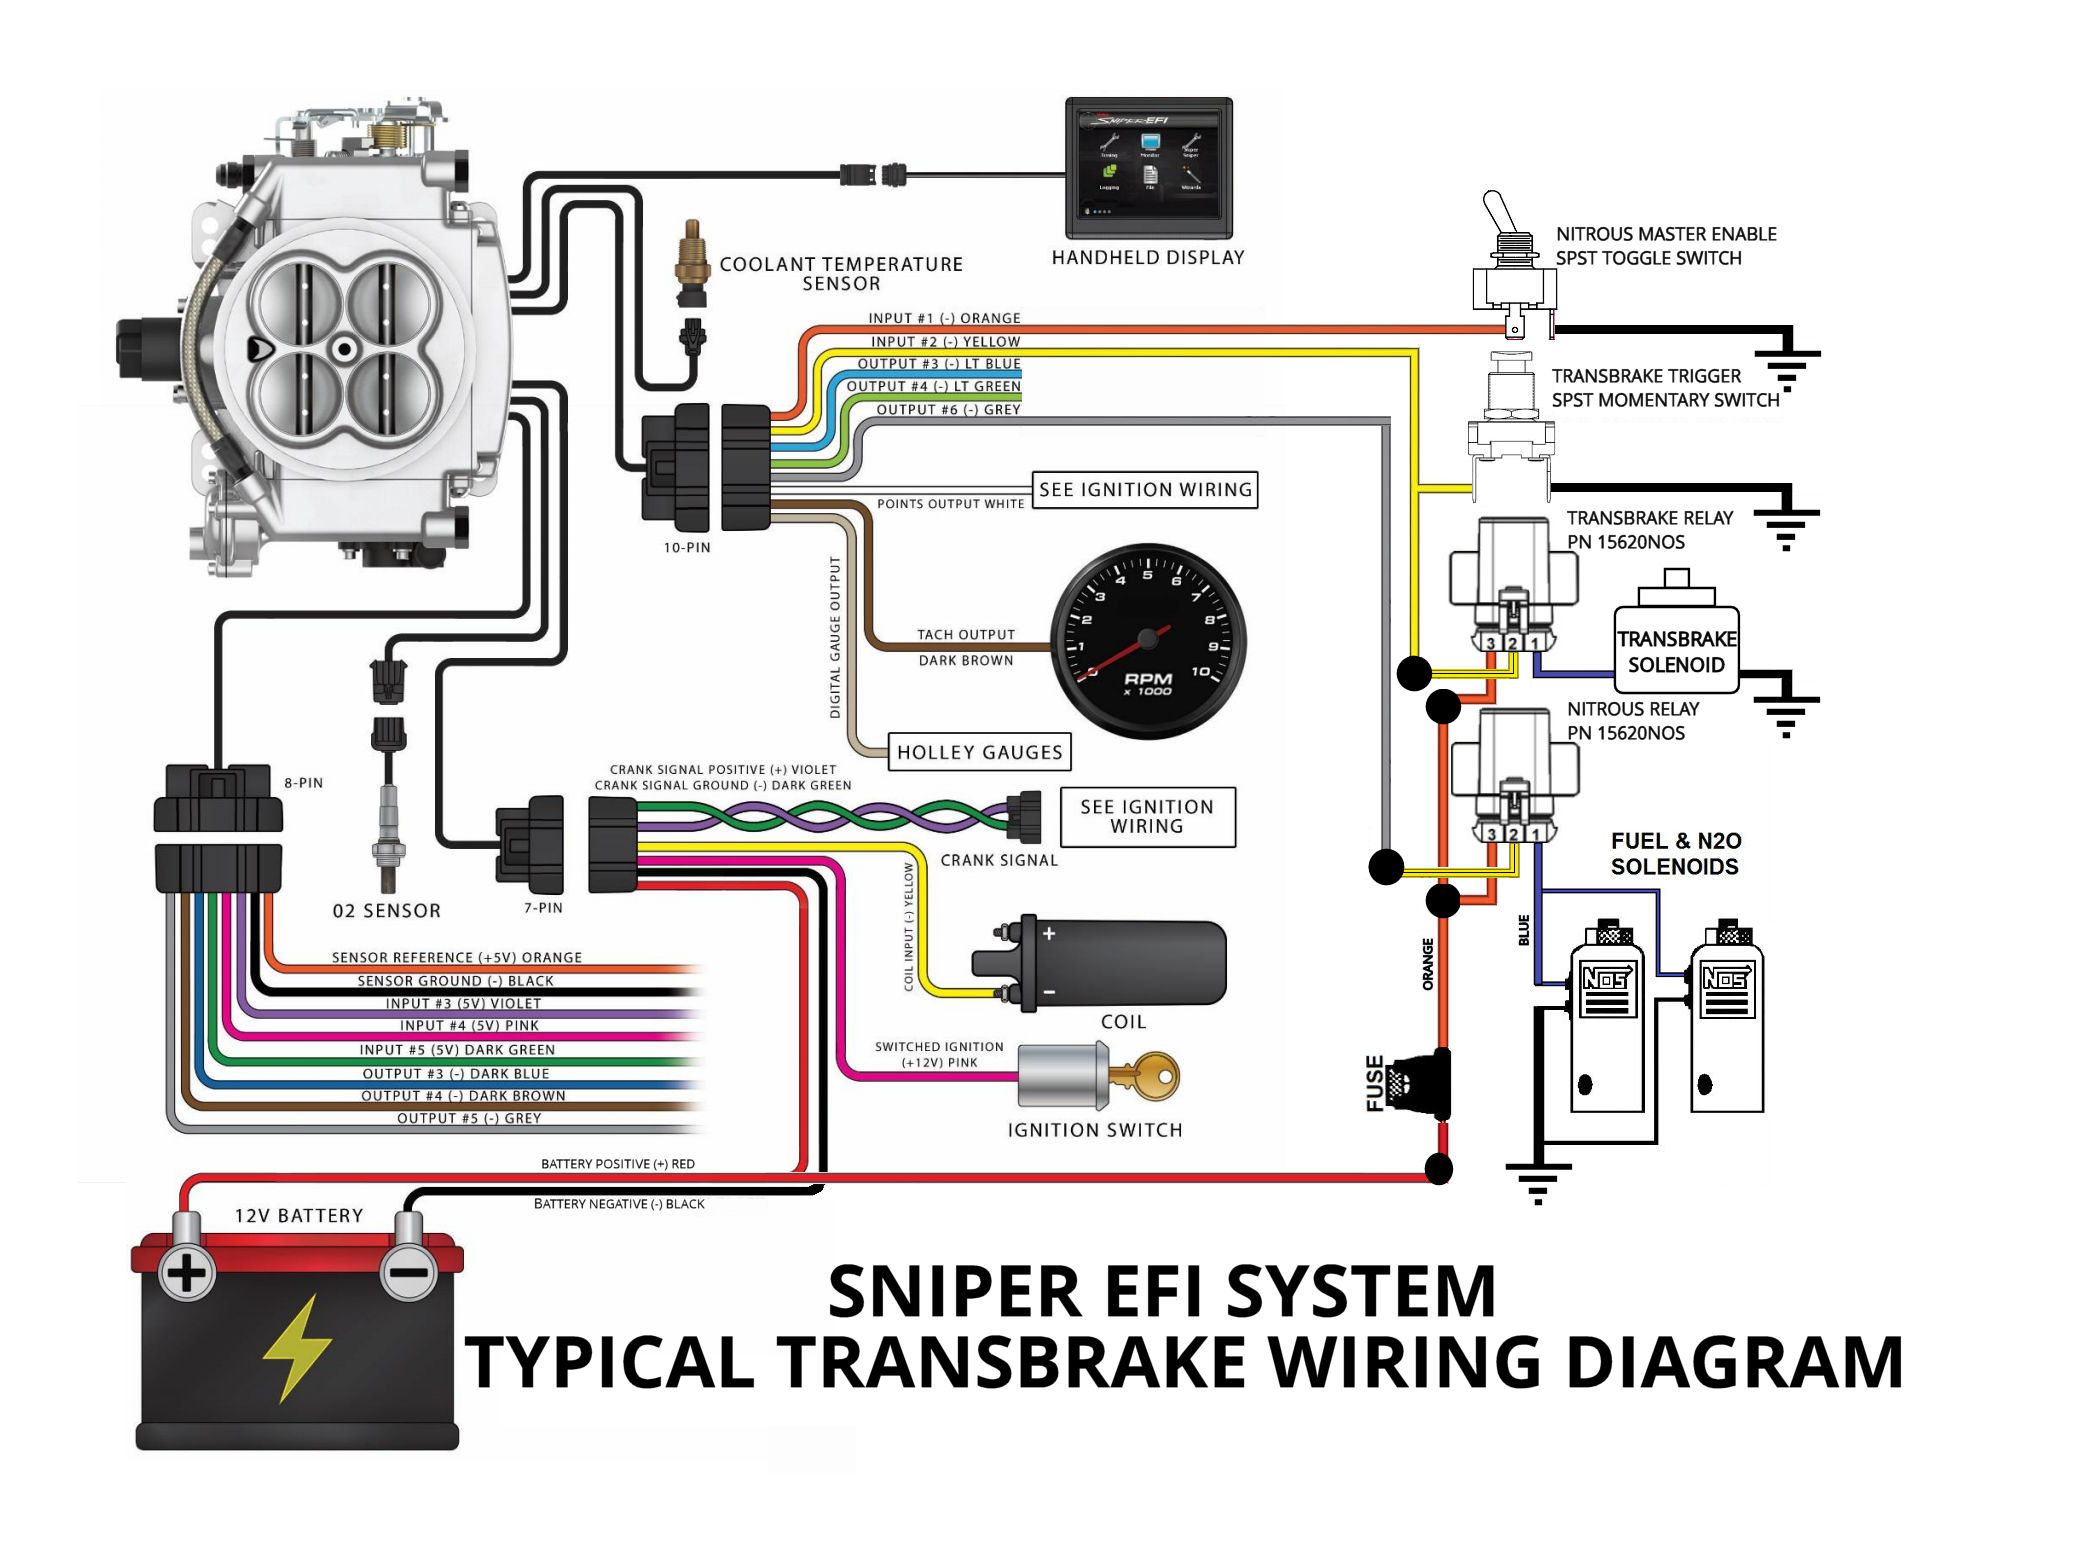
Sniper EFI System Trans-Brake Wiring
As always, be sure to follow good wiring techniques when implementing the wiring diagram below. Do not use the same grounding point for the solenoids that you use for the switches. I only had enough room to show a single fuse to the solenoid drivers but they should each have their own. Be mindful of the current limit for the drivers as well (40 amps) and don't overload them. More detailed guidance for the wiring of the nitrous components is included in the nitrous wiring article, so review that if you haven't already.
Sniper EFI System Trans-Brake Configuration
Steps 1 and 2. These steps involve adding the Nitrous configuration panel to the Sniper EFI Software and disabling some default input signals so they can be used here. These steps are identical to steps 1 and 2 in the nitrous wiring article and won't be repeated here.
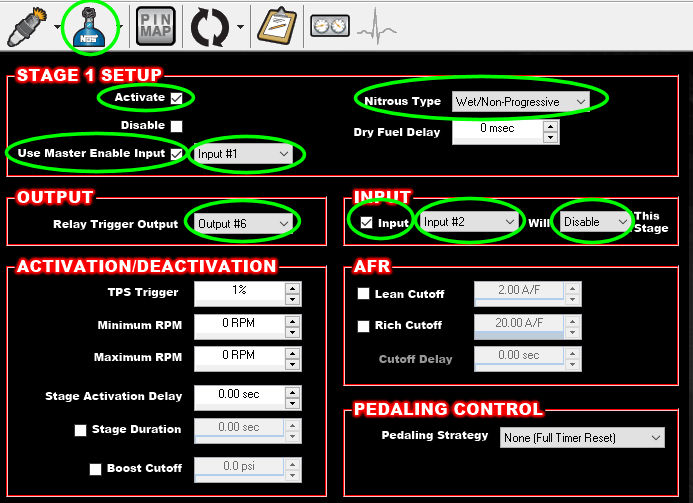
Step 3. Activate Single-Stage Nitrous, set Nitrous Type, and Assign Inputs and Output. Start by clicking on the blue NOS nitrous bottle icon to activate Stage 1 Setup. Then click "Activate" at which point the display will expand to what you see below. Take the following actions:
- Select "Wet/Progressive" for the Nitrous Type
- Check "Use Master Enable Input"
- Select "Input #1" for the Master Enable Input
- Select "Output #6" as the Relay Trigger Output
- Check "Input"
- Select "Input #2" for the trigger input
- Change Input #2 action from "Enable" to "Disable"
If any of the indicated input/output are not available in the pull-down that means they have been used elsewhere. It will be necessary to find and unassign them there before you can use them here.
By setting this up as shown, the momentary switch that we wired for the trans-brake will now be used to disable the nitrous, ensuring that we aren't spraying nitrous while on the trans-brake.
Steps 4 and 5. Here you set the details of the nitrous activation, pedaling and progressive control. Like steps 1 and 2 earlier, these are identical to those detailed in the nitrous wiring article and won't be repeated here.
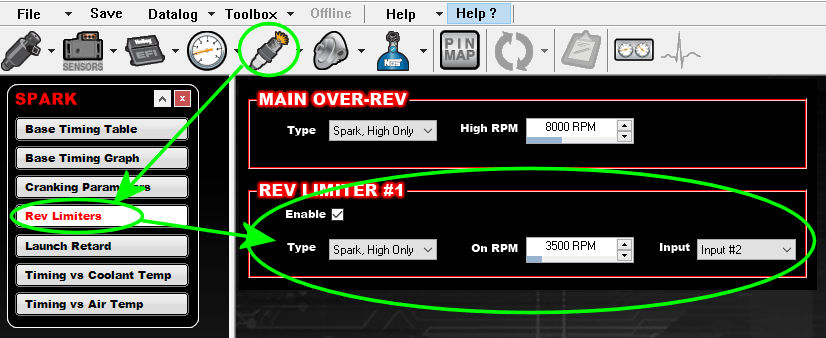
Step 6. Set Trans-Brake Rev Limiter. Part of effective trans-brake launches involves setting an additional rev limiter during trans-brake activation. Click on the Spark Plug icon in the top navigation bar and then click on Rev Limiters in the left navigation panel. Enable Rev Limiter #1 and set your preferred launch RPM. Set the input to Input #2. As you see, this is the same input that is used in Step 3 to disable the nitrous. So by pressing the momentary switch we are doing three things: Grounding the driver for the trans-brake solenoid (which activates the trans-brake capability in the transmission), and grounding input #2 to the Sniper ECU, which simultaneously disables nitrous and now sets a rev limiter at the indicated RPM. And in Step 7, below, we're going to use that same input for one more purpose.
Step 7. Disable Closed Loop Operation During Trans-Brake Operation. Bet you didn't think of this one. Nobody does--until they get everything above set up and try to use this at the track and the Sniper tries to fuel itself to death right there at the starting line. What's up with that?
Well, it's very simple, actually. The rev limiter operates by cutting spark to the cylinders. Pulses of unburnt air/fuel mixture are pumped past the O2 sensor, which reads them as being excessively lean. If you are in closed loop, the Sniper responds by adding fuel. Lots of it.
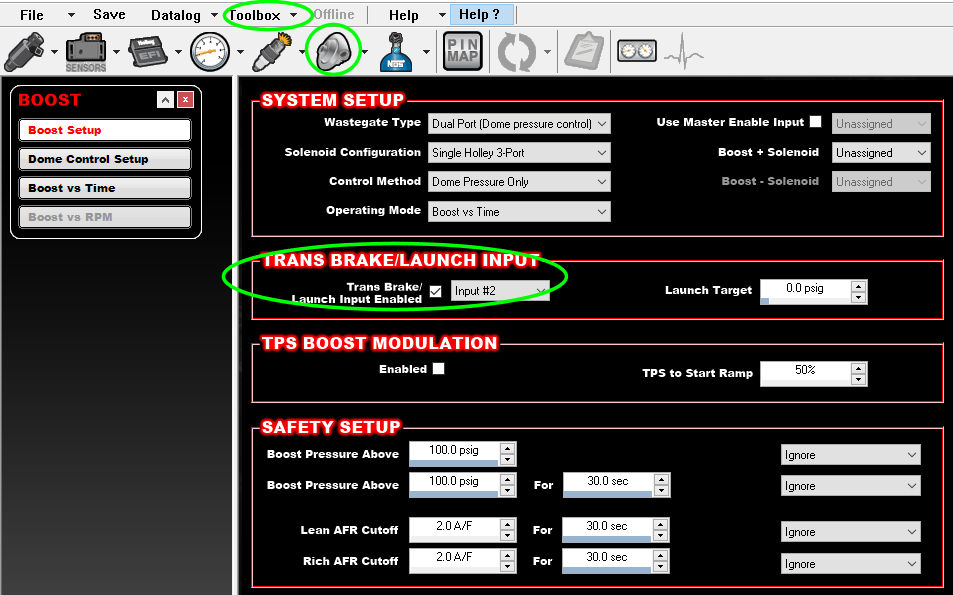
This step requires enabling the Boost Control feature of the Sniper software. Why Boost control you ask? Well, unless you enable and set a trans-brake launch input the ECU won't disable closed loop. Holley decided to put that under Boost Control, which is as good of a place as any, I suppose, since it could be used as part of a boost control strategy.
Click on the small down-arrow to the right side of "Toolbox" on the navigation bar, you will see "Enable Boost"--click that. If you do not have a Super Sniper then you're going to get a warning that you don't have an input pit that is required for dome pressure control. You can ignore that unless you have a turbocharged application and wanted to use the Sniper for boost control. In that case this is telling you that you bought the wrong Sniper EFI System for your application. It will then ask if you want to choose a boost congifuration to import. Simply select "No" and it will upload the default boost configuration, which is perfect. You have succeeded when you see the turbo icon appear as shown. Check the "Trans Brake Launch Input Enabled" box and select "Input #2".
Optional: Dry Nitrous, Timing Retard. That's if--you're done! But there is so much more that the Sniper EFI System can do with regard to nitrous control. The Holley Sniper EFI Tuning and Log View Software User Manual, accessed by clicking the "Help ?" button in the Sniper Software's navigation bar, provides a definitions and cusory guidance on all of the configuration settings that are available to you here. Once you add trans-brake control you've put another notch in your EFI Gunslinger belt!
Would you like to be notified when I post new articles like this? Then join my mailing list! I also send out relevant new product annoucements and let you know if there are any promotions or coupon codes available. If you have questions about the article, or if you implement this and have feedback, please leave a post below. Thanks for reading!
 +
+ +
+ +
+ +
+


2 Comment(s)
I installed my trans brake and nitrous as shown I’m wondering how would I go about adding a momentary switch to the nitrous if I didn’t want to spray as soon as I released the trans brake like if I wanted to spray a mid track any help would be appreciated
Oh, there is a much better way to do this then trying to add more switches. Take full advantage of the control that your Sniper or Terminator X software provides. Go back to your Nitrous stage setup and simply add a "Stage Activation Delay" under "Activation / Deactivation". If you're planning on making a 12 second pass and want to spray at mid-pass then set the delay for 6 seconds. Shorten that up if you're wanting to spray at mid track.
I didn’t see a reference to the transbrake flyback protection module. Is that another component needed complete the system?
That is a good observation since I don't specifically address it. In one form or another, one must always protect the ECU when it is being used to trigger the transbrake. And in other ECUs (including the Holley HP and Dominator ECUs) the way to do that is with a transbrake flyback protection module. But that requires an active-high output that is not available on the Sniper. Since the Sniper only provides active low (ground-triggered) outputs something different must be done. It turns out that the same high-current solenoid driver that is used to allow the Sniper to activate the nitrous solenoid can be used to activate the trans brake. That's why we call for two of them above. Be sure to follow the wiring shown above and do not try to wire the high-current solenoid driver in the same way you would a transbrake flyback protection module.
Leave a Comment