Introduction
This article was originally written to describe how to configure nitrous control into the Sniper EFI System. However, most of the information is directly applicable to Terminator X so we invite those owners to use this as well.
As always, a note up front about what this article is and isn't. First, I don't specify any nitrous hardware in the article. There are a huge range of brands and an even larger range of different kits within those brands. I don't get into selecting nozzles or calculating fuel requirements or pojected horsepower. Those are all great subjects but are beyond the scope of what we will discuss here. And I certainly don't want to imply that this is the only way to do a nitrous oxide setup on a Sniper EFI system. This is a setup to introduce you to the most important features of Sniper and Terminator X EFI System Nitrous Control and give you the confidence you need to get started on building the perfect setup for your requirements.
My goal on this is to give you general overview of how you might wire the requisite switches and solenoid driver to establish a solid working nitrous oxide system controlled by your EFI System, and then provide pointers on configuration within the setup software. Once you see how this is done you should be able to proceed with your installation having the basic guidance that is otherwise lacking in any other Sniper EFI System documentation that I have found. While I use the Sniper EFI System as the baseline for this article, this will be a very solid reference for most aftermarket EFI systems that have the ability to control nitrous oxide, and will be an outstanding reference for any Holley EFI System (including the Terminator EFI System or any EFI system based on the HP or Dominator ECU.)
NOTE: Spraying nitrous oxide into your engine has the potential of destroying the engine or creating horsepower levels that may be unsafe for the chassis or driving environment. It's use is illegal in some locations and should only be used in sanctioned racing competition that specifically condones and regulates the use of nitrous oxide. The reader, and not the author, bears all responsibility for the results of the use of this information. Check the regulations in your area and proceed only with the wise counsel of someone who can provide the many details that are left out of this article.
System Overview
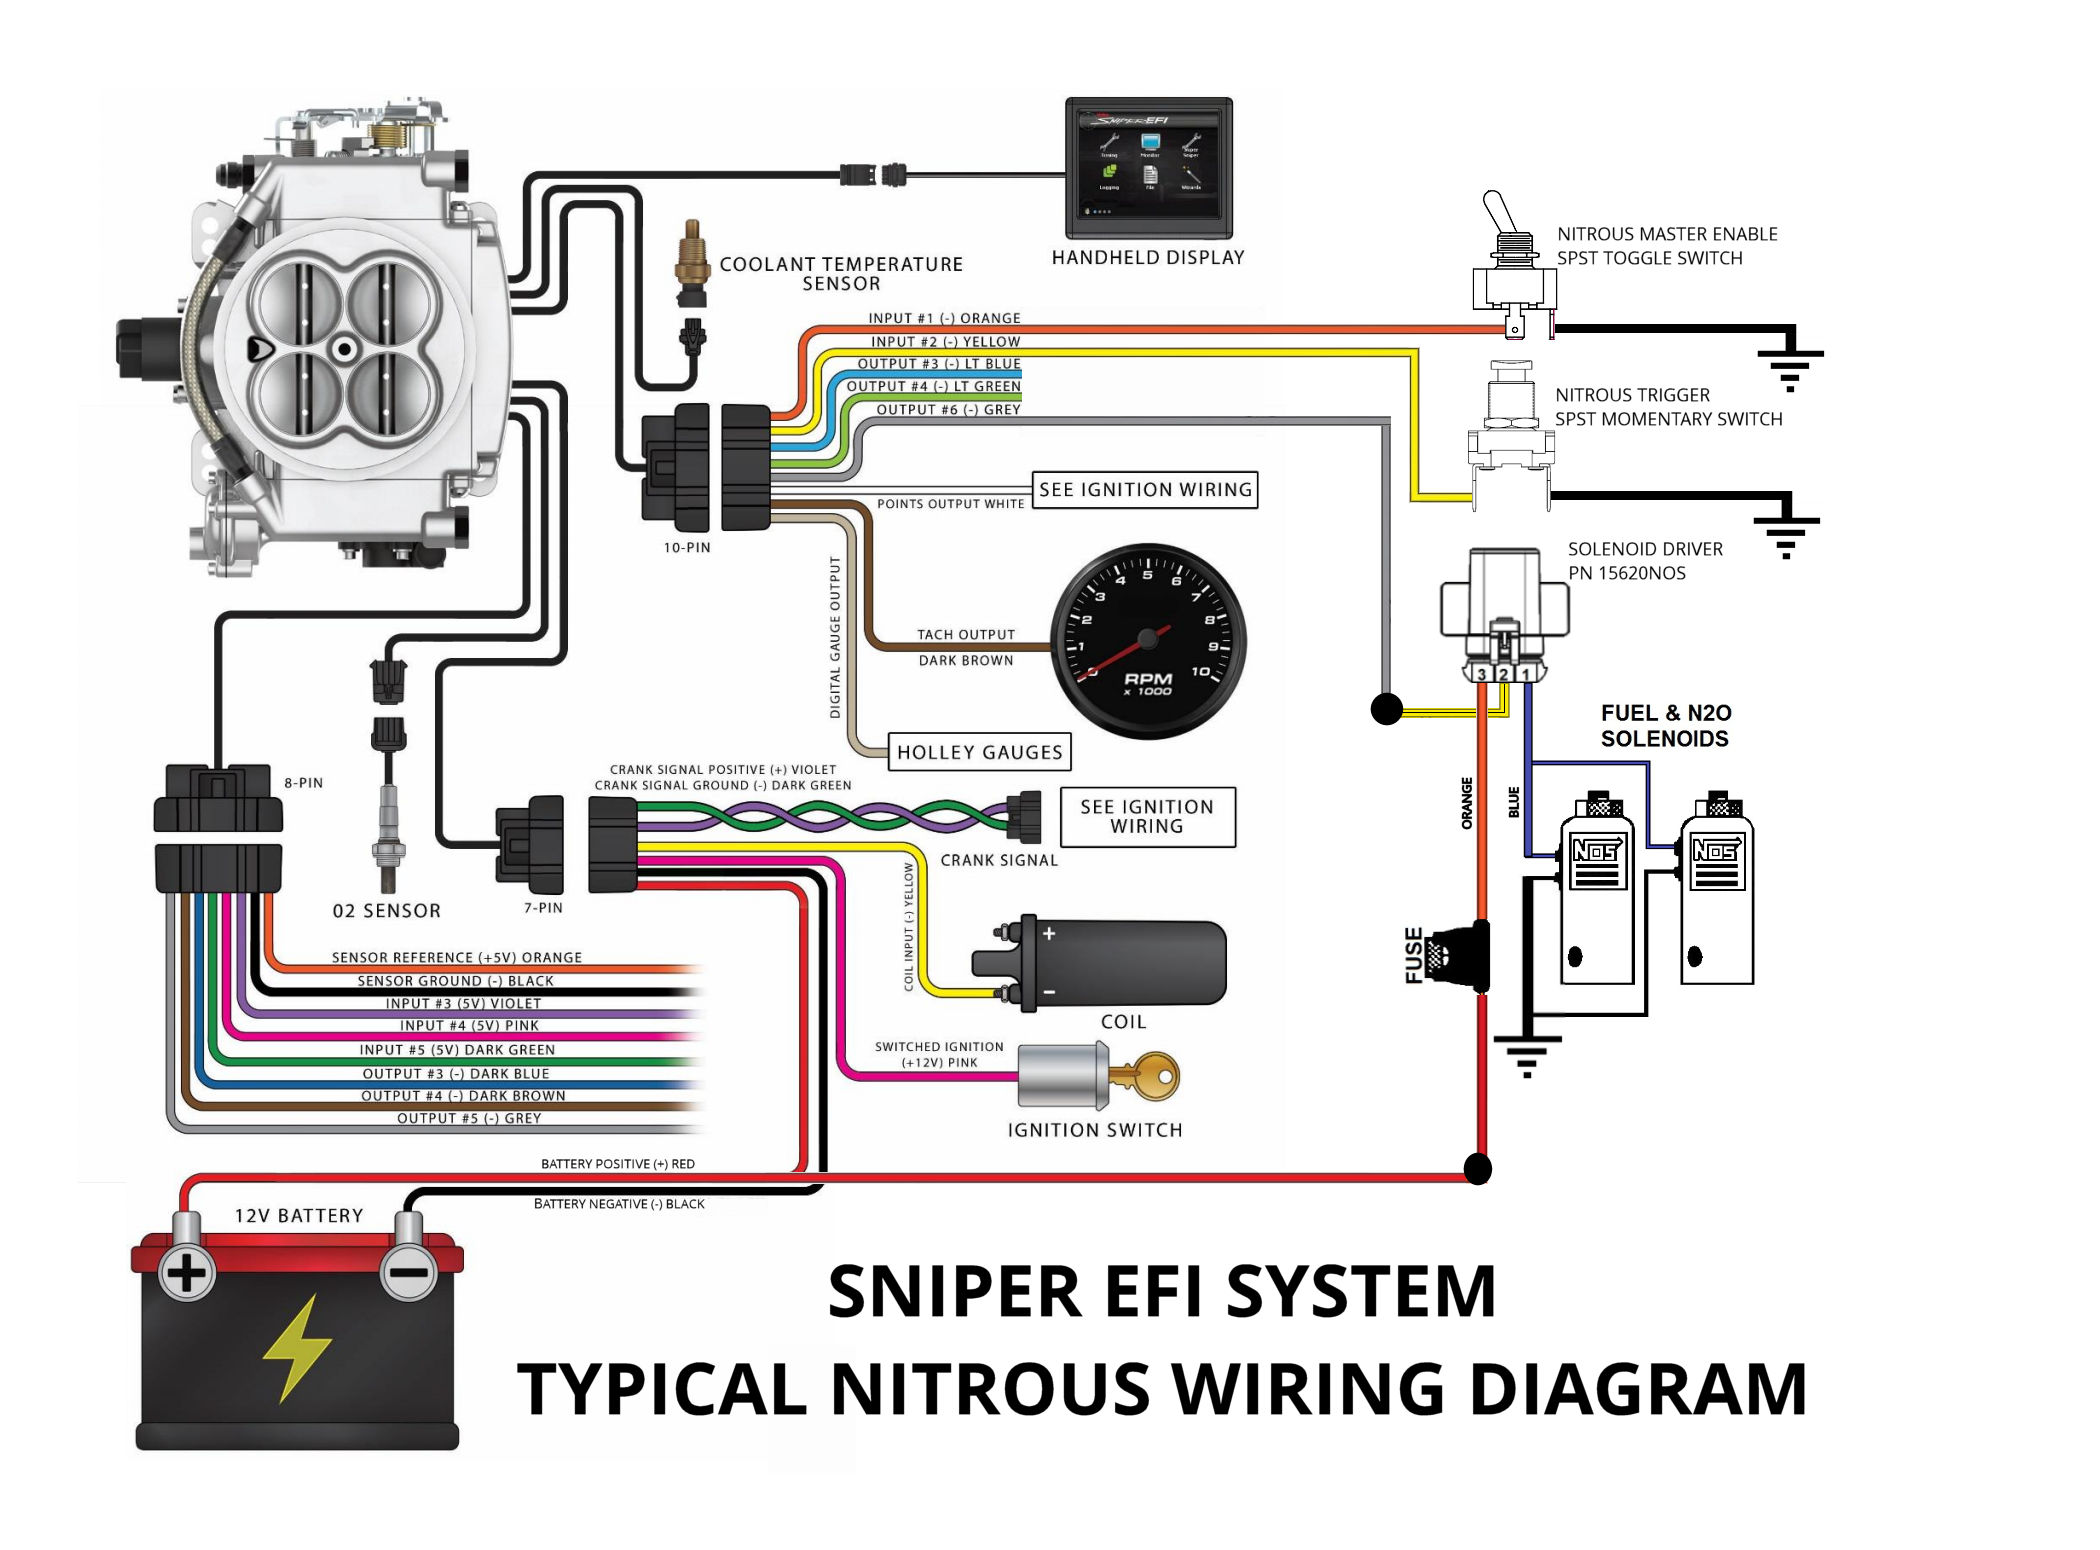
The system we will be specifying in this article will be provide a single stage of nitrous oxide injection that is progressively applied over time. The diagram we use shows dual solenoids indicating a "wet" nitrous system, that is, one that sprays the additional gasoline required by the horsepower increase that the nitrous produces in the engine. I prefer to implement "dry" nitrous systems, where the EFI System itself adds the necessary increased gasoline, but because that would probably double the length and complexity of the article we will stick with "wet". A two-step arming system is established with a master arming switch as well as a both a manual and a throttle-position-based nitrous "trigger".
Components Used In This Example
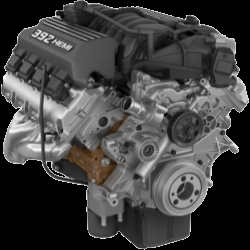
- Sniper EFI System. Any of the Sniper EFI Systems currently available can be used, from the Sniper 2300 2BBL EFI System on up. As mentioned above, this could just as easily be implemented on any other Holley EFI System, since the configuration software is similar.
- Basic Wet Nitrous System. We will not specify all the details of the system for this example. A nitrous solenoid capable of flow-control via modulation in the 10-20 Hz range is required to provide progressive nitrous application.
- SPST Toggle Switch: This will be used as the nitrous system's master arming switch. It would normally be mounted on the dashboard or some similar location where the actions involved in driving the vehicle could not accidentally enable or disable it. DelCity.Com has a broad selection of switches like this, as would any local electronics shop.
- SPST Momentary Switch: This would normally be mounted on the shifter or steering wheel. It must be mounted where it can be held in the on position during the entire time that nitrous is intended to be sprayed. Releasing this switch would stop the spray of nitrous (as configured in this example.) These, too, can be found at a local electronics supply store or at DelCity.Com
- High Current Solenoid Driver: In order to pulse the nitrous solenoid so that nitrous can be progressively injected, a driver like the NOS 15620NOS Solid State Relay must be used. A standard switching relay is not appropriate for pulsing solenoids at the frequency this system uses even if it can support the current draw of the solenoid itself.
Sniper EFI System Nitrous Wiring
The diagram below is fairly self-explanatory but I will provide a few comments. First, the Sniper ECU should be grounded directly to the battery, and there should be good separation between the noisy high-current grounds like the solenoids and low-noise grounds (like the ECU inputs.) Do not ground the solenoids and input switches together at the same point.
The maximum current draw through the 15620NOS Solid State Relay / Solenoid Driver should be limited to 40 amps, but I would use a fuse that is closer to the maximum current draw for the solenoid itself. Typical draws vary widely, but for a NOS PowerShot solenoid is 10.3 amps at 12 volts, so using a 12- or 15-amp fuse would be more appropriate for that particular solenoid. When implementing a wet system with two solenoids, be sure to add the current ratings for both the nitrous and the fuel solenoid to come up with the fuse rating. Note: If the combined amperage draw for the solenoids is over 40 amps then you will need to use two of the 15620NOS relays, one for each solenoid.
Even though it has nothing to do with nitrous oxide system wiring, It is probably a good idea for me to point out that the diagram below shows the yellow wire connected to the Coil (-). That should only be done if the coil (+) is connected to a 12-volt source and not being driven by any sort of ignition amplifier or ignition box. If any voltage source other than 12 volts is being used then connecting the yellow wire to Coil (-) could destroy your Sniper EFI System. Please refer to the Sniper EFI installation instructions for more details.

Sniper EFI System Nitrous Configuration
The Sniper instruction manual states that there are "Pre-configured Inputs and Outputs for Nitrous Wizard Calibrations" for the pins on the 10-pin connector but that is not my experience. If I am incorrect I trust someone will gladly educate me but even when I indicate to the setup wizard that there I am using Nitrous Oxide as a power adder it still makes the same assignments of input pins #1 and #2 and output #6 as the standard Sniper. So I'll be showing you how to reconfigure the inputs and outputs to support the wiring diagram shown above, as well as giving some tips on other configuration settings that you might choose to use in your particular setup.
To initially configure nitrous oxide control on your Sniper EFI System requires you to use the Sniper Software. After the initial configuration is complete you can then afjust the tune using the handheld controller. Refer to my instruction on Sniper EFI Firmware to determine which software version you need for your particular firmware and how to download that.
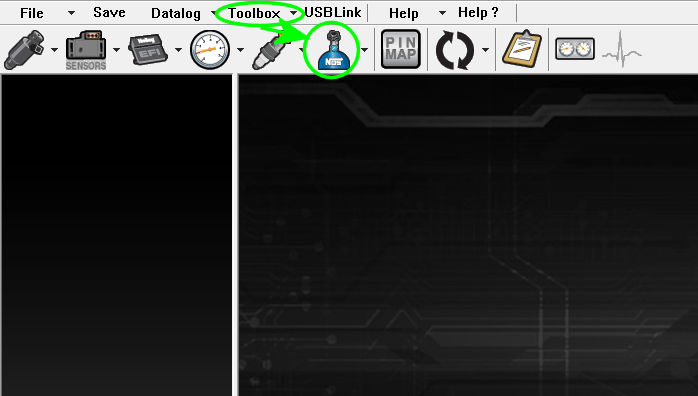
Step 1: Enable Nitrous. Once you have the Sniper Software operating on your MS Windows-based computer you can either save your current configuration to the SD card and then use the software to open that configuration or you can use the CAN-to-USB adapter harness to connect directly to your Sniper EFI System and download the configuration from the ECU into the software. At this point you will see something like the following image. If you click on the small down-arrow to the right side of "Toolbox" on the navigation bar, you will see "Enable Nitrous". Click that. It will ask if you want to choose a nitrous congifuration to import. Simply select "No" and it will upload the default nitrous configuration, which is perfect. You have succeeded when you see the blue NOS nitrous bottle icon appear as shown.
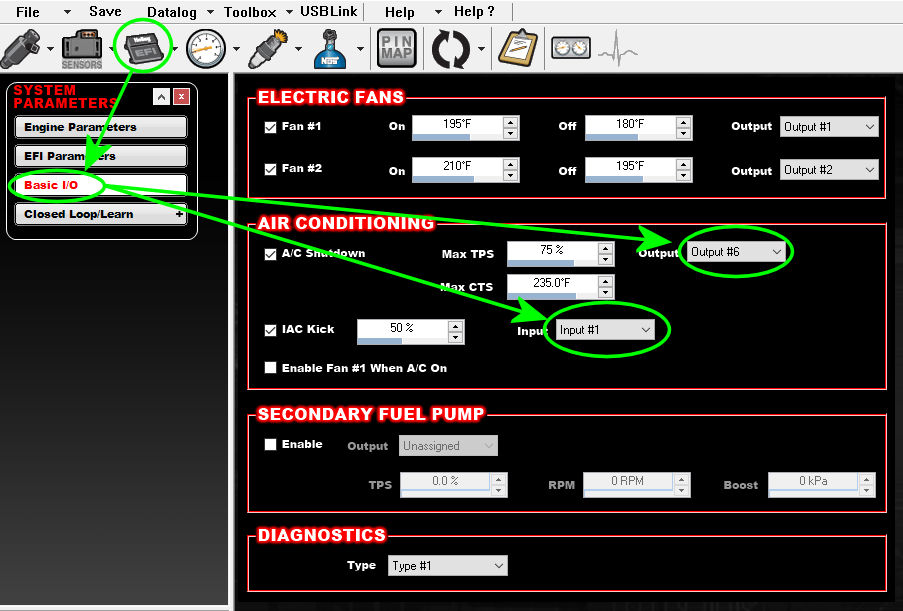
Step 2: Unassign Required Inputs & Outputs. The only way to use the two input signals and one output signal that are required by our wiring is to first unassign them from their default assignments. Start by clicking on the ECU icon (as shown in the image below) and theck click on "Basic I/O" in the task bar to the left. In the window to the right you will see that Output #6 is being used by the A/C Shutdown configuration and Input #1 is being used by the IAC Kick configuration. Using the selection tool, change these both to "Unassigned". Note that these must be "enabled" to make a change, but once changed to "Unassigned" you can disable them. Note also that it is not adequate to simply disable these configurations because the Sniper software prevents any input or output from being used in two different configurations.
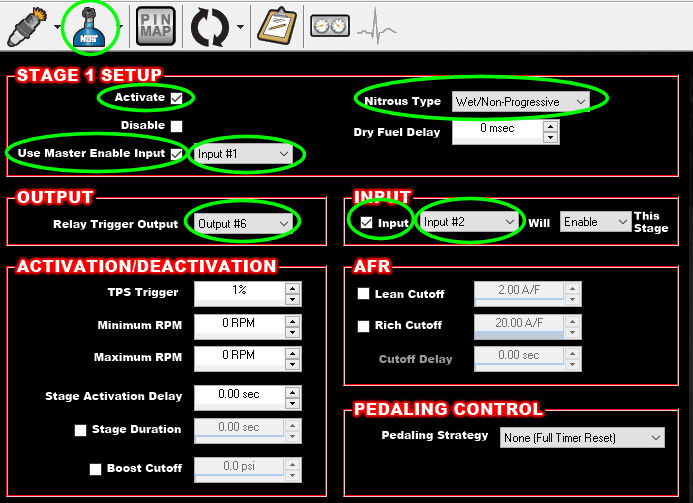
Step 3. Activate Single-Stage Nitrous, set Nitrous Type, and Assign Inputs and Output. Start by clicking on the blue NOS nitrous bottle icon to activae Stage 1 Setup. Then click "Activate" at which point the display will expand to what you see below. Take the following actions:
- Select "Wet/Progressive" for the Nitrous Type
- Check "Use Master Enable Input"
- Select "Input #1" for the Master Enable Input
- Select "Output #6" as the Relay Trigger Output
- Check "Input"
- Select "Input #2" for the trigger input
If any of the indicated input/output are not available in the pull-down that means they have been used elsewhere. It will be necessary to find and unassign them there before you can use them here.
By setting this up as shown, the momentary switch that we wired will now be used as a secondary enable, meaning that in addition to arming the system with the toggle switch you would need to keep the momentary switch pressed anytime you want to spray nitrous. An alternative method (that won't be discussed in adequate detail here) would be to use this button as a disable, which would allow you to disable the nitrous while you are on the trans brake. This gets a bit more complex and requires specific protection measure for your ECU if you wanted to use your transbrake button as a nitrous diable button. Proceed that way with appropriate caution. (See the link to my transbrake setup article at the bottom of this article.)
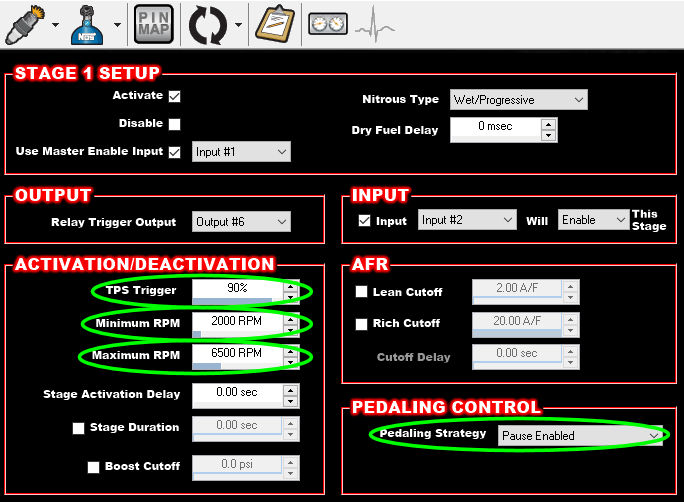
Step 4. Select TPS Trigger, Minimum and Maximum RPM limits, and Pedaling Strategy. Probably the primary consideration of where to set the TPS trigger will depend less on how far you want to press the pedal before nitrous sprays and more on how far you want to have to lift to get it to stop. Remember that the TPS rarely goes to 100% (which is okay provided that the throttle is opening all the way) so setting the TPS trigger to 90% does not mean that you will lift by 10% for the ECU to determine that you are "pedaling" and shut off the nitrous. For this example I set the pedaling strategy to Pause Enabled, which means the ECU will stop spraying nitrous when the pedal is lifted, but will go right back at it when the pedal is again depressed.
The minimum RPM setting is not meant to control when the nitrous is initially sprayed. That is better controlled by your momentary nitrous trigger in this particular setup. This is purely to ensure that you don't spray nitrous at too low of an RPM which could damage the engine. The maximum RPM should be set a few hundred RPM below your redline.
Update 11 June 2019: I fail to point out above that you need to enable and set a stage duration. Not much is going to happen without that.
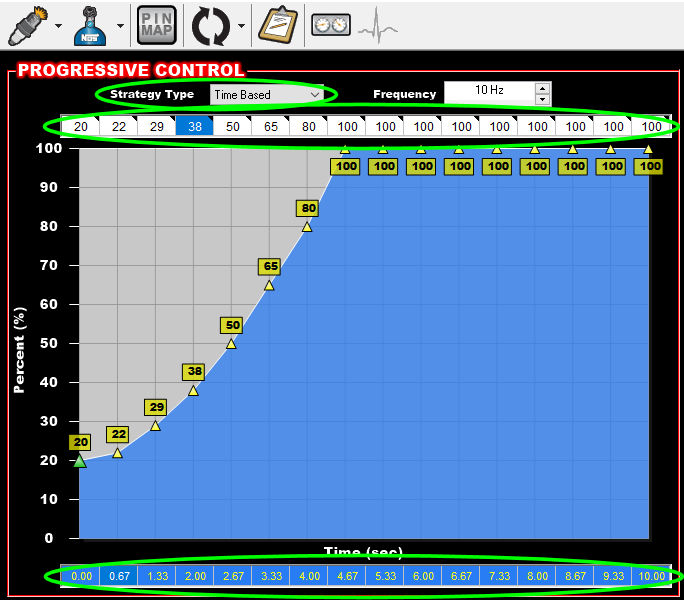
Step 5. Set Progressive Control. For this example I have chosen time-based progressive nitrous appliation. The default frequency setting of 10 Hz is generally adequate for most solenoids. Next, go down to the time scale at the bottom. With zero in the leftmost cell, round your ET up and put that in the rightmost cell. Then right-click anywhere on the scale and choose "Fill Row Values". You can now go and set your percentages of nitrous application at each RPM level at the top of the graph or by dragging each triangle to the value you choose. Don't assume that this is a particularly good example of progressive control--you will need to develop that for your own engine through testing.
Optional: Transbrake, Dry Nitrous, AFR Cutoff, Timing Retard, Closed Loop Control. The goal of this article is not to give a comprehensive overview of everything that the Sniper EFI System can do with regard to nitrous control but rather to provide a quick familiarization so that you will be compelled to try more. The Holley Sniper EFI Tuning and Log View Software User Manual, accessed by clicking the "Help ?" button in the Sniper Software's navigation bar, provides a definitions and cusory guidance on all of the configuration settings that are available to you here. You've got this, Pro!
As promised, here is the link to the Transbrake Setup Article that I wrote that extends the information here out to include transbrake control.
Bench Testing Tips: (Added 11 Jun 2019) If you want to bench test this there are a couple of things to keep in mind. First, you'll need to run your minimum RPM down to 0 unless you have some better way to simulate 2000 RPM (or whatever minimum RPM you have selected for your setup.) Second, you need to go into the Fuel / Startup Enrichment tab of the software and move the "Clear Flood TPS" up to 100%. If you fail to do this you will experience all sorts of bizarre behavior when transitioning the TPS across the Clear Flood TPS value. Don't forget to change this back to whatever value you prefer. Crossing the Clear Flood TPS level will have no effect when the engine is at operating RPM.
I hope you enjoyed this!
If you did then there are three things you should consider:
- Join my mailing list! It costs nothing and allows me to let you know about things like new articles, coupon codes, and product releases that may be of interest. I look forward to seeing you there!
- Post a comment below! I would love to get your insights on what I've shared here.
- Read other articles I've written about the Sniper EFI System and other EFI topics.
 +
+ +
+ +
+ +
+


9 Comment(s)
Very good article, Thank you. Was wondering if I could get some more info on the part of using the transbrake as a disable switch. Thanks.
I'm glad you've found this helpful! Actually, I've got the hard part of writing the Transbrake article you request done (creating the schematic) and just need to find the time to put words to it and publish. Look for that soon!
Thanks Chris, I will be looking for that!
I just purchased the Holley sniper stealth 4500. My plan is to run 1 dry kit through plate. Couple questions.
On my carb set up I used a wot micro switch to activate. Can the tps on the sniper be used for this?
On the carb kit I used two relays so that I could give it wot on the transbrake. The nos would hit on realease of the transbreak button. Can the sniper do this with out the two relays.
Any other tips on the dry install would be helpfull
This will work great for you. Step 4 (above) shows how the TPS can be used in place of the WOT micro switch. Simply set the percent at which you want the nitrous to be activated and you're all set. For tips on Transbrake setup, be sure to see my follow-on article on that. I'm going to have to do a separate article on dry nitrous setup but it is certainly the preferred way to go. You have to ensure that you have enough fuel pump and injector capacity to support both your NA and Nitrous horsepower. With the Sniper 4500 injector capacity shouldn't be a problem but do your math.
I’ve followed these instructions and still am not able to get the solenoids to activate what am I missing
Based on your short description it's a little hard to say. There are a few things you can do to try to divide up the system a bit and find the problem.
I'd start by disconnecting the 10-pin connector and grounding the output you used for your solenoids on the side of the connector that goes the the solenoids. In the example above, that's the grey wire. Does the nitrous solenoid engage? If not then your problem is to the right of the connector.
If the solenoid does engage then reconnect the connector. Put the black wire of your volt meter on the input the Nitrous Master Enable that is connected to (the orange wire in the example above. Put the red wire on the battery +12 volts. With the switch off, you should show zero volts. With the switch on, the black lead is connected to ground so you will show the battery voltage (12 VDC, approximately.)
If that works, then do the same thing with the input to the nitrous trigger (the yellow wire in the example above.) Again, when you press the button, the volt meter should be grounded and show 12 volts on the gauge.
IF everything works to this point you're going to have to dig in to your configuration--either something is not right in the configuration or there is something physically wrong with your Sniper throttle body. At this point you may need to enlist the help of whomever sold you your Sniper. Hopefully they are as ready to support their customers as well as we do ours, right? :-)
Great write up, I fumbled thru finding out I had to unassigned inputs before reading your article. I made a few adjustments as per your write up. The only thing that doesn't work on my program is no matter what I do I cannot get input #1 to come up on Master enable input. I can get it to show in regular input only. Even if I assign #2 to the regular input it still is not available for the master input?
The only reason that you would not see those inputs is if they are assigned to something else. Look at the pin map and ensure that the pin input you want to use is listed as Unassigned. Remember: it's not adequate to simply disable everything else that it using that input. You must re-enable it, unassign the input, and then disable that feature again. If you've done that then you should be find the input is available to assign to something else. If you're doing that and it's not working then you might want to contact Holley to see if they have some insights but I can't imagine that's the case.
On my current carb set up I’m all in with the wot switch. Can I do the same with the tps without the button and not have progressive control either?
Absolutely! In step 3, above, you will simply choose either Wet/Non-Progressive or Dry/Non-Progressive and the software will reconfigure the display to show you just the fields you need to set up non-progressive ("all in") control. Activation can still be based on the TPS position of your choice. Note that the linkage usually doesn't carry the TPS sensor all the way to 100% (that's a good thing) so you need to see where your TPS max's out when you put your throttle pedal completely to the floor rather than simply set it to 100%.
My question is if you use the transbrake feature as you showed will it disarm the nitrious until you release the button
Yes, it will. As you will note the Transbrake Enable input selected in Step 7 (Input #2) is also used as a Nitrous Disable input in Step 3.
So I've bought a sniper EFI standard 4 barrel kit for a small block chevy, 4bbl Part 550-511 and I keep reading that this NOS setup is only for the super sniper? but you mention here that any system can be used? can the standard 4bll 4150 self-tune sniper system be used if set up on the PC software?
The primary benefit of the Super Sniper with regard to nitrous use is that is that it allows nitrous setup in the Setup Wizard. I absolutely recommend not trying to use the setup wizard to set up the nitrous but rather wait until the system is running well w/o nitrous and then use the Sniper software to do the nitrous configuration (as shown above.) At that point the difference between the standard or Super Sniper is irrelevant provided you've don't have the I/O tied up with something else and need the extra I/O provided by the Super Sniper.
Great writ up. Thanks for all the info! Question. I am using a wet system with the super sniper stealth. I will be using an auxiliary fuel pump for the NOS fuel feed. What's the best way to turn on the NOS fuel pump. Can I use an output from the sniper or should I use the master enable toggle switch? If using the toggle switch can I wire a relay for the fuel pump, negative switched, to the master enable toggle switch? Will there be any Interference from putting an additional wire on the switch? Thanks for the help.
I don't see a problem with powering on your NOS fuel pump using the master enable via a relay. I don't expect there would be any interference as long as the fuel pump is not connected to the Sniper.
I have the basic Sniper 4150 kit and I'm trying to find a way to trigger the electric kickdown switch on my TH400 transmission. Do I need to use the nitrous setup to use #6 output or is there another way? Do I have to use inputs to be able to use outputs? If so can I just ground the inputs? I just need a simple output that is controlled by TPS. Last question, the kickdown switch draws a maximum of 1.2 amps, do I need to use a relay or will the sniper output be fine without? I hope all this makes sense, please help.
You're on the right track. No, it's not necessary to use the Sniper's Nitrous ICF to control this. Just use the A/C shutdown in the Basic I/O configuration settings. If it's me I use a relay. If you need to provide 12 volts to activate the kickdown it's non-optonal (since the Sniper output can only provide a ground output.) But even if it is activated by grounding I'm not going to connect anything to my ECU's outputs without a relay. I suppose there may be situations I could think of where grounding some ultra-low amperage signal would be fine but a relay is just too cheap and easy to install.
Leave a Comment