Tuning Your Engine Startup
How efficient is your engine startup? Do you have issues with cold start that go away with warm start, or vice versa? Let’s dig down into that a bit and see if we can help. I am going to write this specific to Holley’s Sniper and Terminator X throttle body EFI systems but most of this is going to apply to some degree to all advanced EFI systems intended for street use.
Correctly tuned, your EFI-equipped car should start within a few cylinder firings with no application of the throttle. Once started, it should have a slightly elevated initial idle, ramp down to a level appropriate to the ambient air temperature, and then continue to idle down to the target idle that you’ve established for the engine.
Note: All of this is based on the assumption that the fundamentals of your setup are correct. This includes:
- Actual fuel pressure matches what is specified in the configuration
- Fresh spark plugs of the manufacturer’s specification are installed
- Adequate and fresh fuel is in the tank
- Engine is timed and tuned for correct performance
Finally, while many of these tuning steps can be performed using the handheld, you’re working in the dark if you aren’t using the system’s data logging feature to tell you what’s going on. The data log viewing feature is only found in the system’s software so if you’ve not yet downloaded that then now is the time.
First Start-up
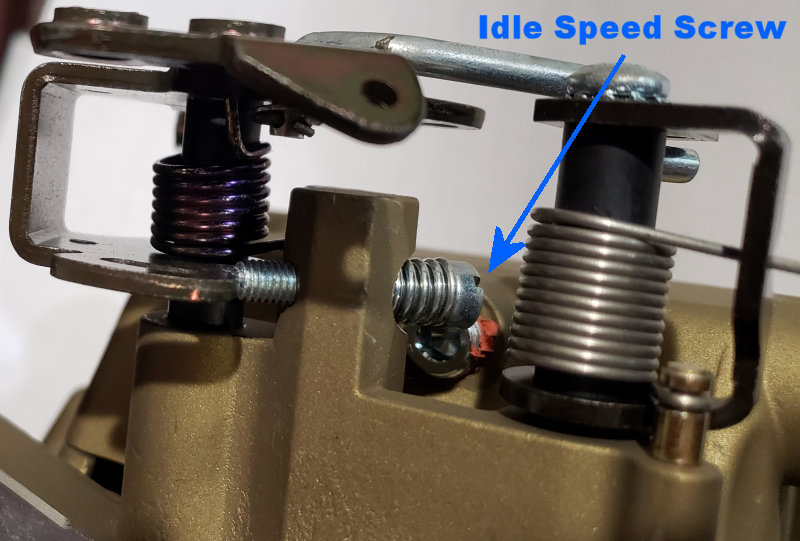
Except for drive-by-wire throttle bodies (which we won’t discuss in this article), most throttle bodies are going to have an idle speed screw that sets how far the throttle blades are open when the throttle pedal is fully released. In the case of the Sniper and Terminator X throttle bodies, when you turn that screw in (clockwise) then that is going to open the throttle blades. Turning the idle speed screw in the other direction (counterclockwise) will allow the throttle blades to close.
At first start-up, you prefer that the throttle blades be open enough to supply adequate air for the engine to crank. Out of the box, Holley normally has their idle speed screw set at 2 to 2 ½ full turns beyond the point where the screw first hits the throttle lever. This is normally completely adequate. Too little opening and the engine risks not having enough air to start. Too much and it will simply idle high and can be manually adjusted down. Regardless, this screw will eventually need to be adjusted. More on that later.
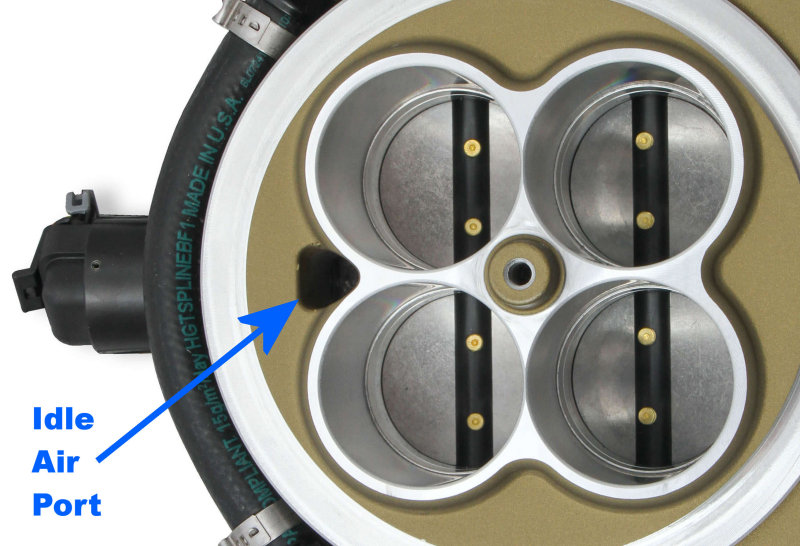
Air is not just coming into the engine via the throttle blades. It is also coming through the idle air port. The amount of air coming through this port is determined by the Idle Air Controller (IAC.) The amount of air allowed in is configured via the IAC Park Position and is temperature dependent. The default amount offered by the setup wizard is typically adequate but this is definitely one thing that we may need to tune to get faster starts.
Fuel must also be added to start the engine. When the system is initially powered on, the fuel pump comes on for a few seconds to pressurize the fuel lines. A brief spray of fuel is injected before cranking. This is called the fuel prime shot. Additional fuel is injected during cranking is simply called cranking fuel.
Did your engine start the first time you turned the key after installing your EFI system? Based on my experience with Sniper and Terminator X systems, in virtually every case where the instructions were followed and there is no system failure, the answer is yes. I call this the “Happy Dance” moment. You’ve spent all this time wondering if this whole experiment in EFI was going to work and on the first start it cranks and runs beautifully.
Addressing Problems
But what if it doesn’t? Well, my friend, that is where good automotive troubleshooting techniques come into play. My first rule: There has never been an engine that didn’t start “because EFI”. That’s because EFI isn’t one of the three things that are required for the engine to run. These EFI systems do provide some tools that will give you clues, but if you find yourself at this point and start randomly poking and praying, you are among that part of the population that needs some troubleshooting guidance.
Engines require three things to run. Compression, properly metered fuel, correctly timed spark. Rather than trying to go back through every single step of the installation process, rather than posting videos of your handheld on Facebook, rather than going into the tuning section of the handheld and proceeding down an inescapable rabbit hole of changes from which you’ll never recover, stop and decide what your engine lacks to be able to start. Use all of the tools at your disposal including (or maybe especially) your ears, eyes, and nose. A couple of questions to ask yourself:
- Did you hear the fuel pump run at key-on?
- Is the fuel pressure correct? (You DO have a fuel pressure gauge installed, right?)
Remove the air cleaner and have someone key the system on while you look down the throttle bores.
- Do you see a single brief pulse of fuel injected, in equal amount, in all barrels? (Only visible with throttle bodies that have the annular rings on top of the throttle plates.)
- While continuing to observe the barrels, crank the engine. Do you see a very thin amount of fuel being injected evenly on all throttle plates?
- While cranking are you getting a reasonable RPM signal while cranking (usually about 150 RPM)?
- Does it smell rich? If so then it is (regardless of what the O2 sensor says.)
- When you remove a spark plug is it bone dry or dripping wet?
- Are you getting spark?
- Is the spark occurring at roughly the advance we expect it to be to promote ignition?
- Does pressing the throttle slightly allow the engine to start?
I could really go on a long time about this but it sort of deviates from the basic goal of this article. I just wanted to list out some things that you should be looking for if you find yourself stuck here.
Cranking Air Variables
If the engine starts we can get into the original purpose of this article—discussing things you can do to ensure that the engine starts quickly. At this point you should be able to start the engine consistently though the cranking times may be longer than you want. Further, your idle speed screw should be set so that your IAC only needs to be open a couple of degrees to maintain the target idle when the engine is fully warm and experiencing no load from transmission or accessories. (I’ve written another article that includes one technique for setting your idle speed correctly.) Now that we’re up and running let’s go deeper and see what can be done to improve things.
Understanding Crank-to-Run RPM and Start-up Fueling
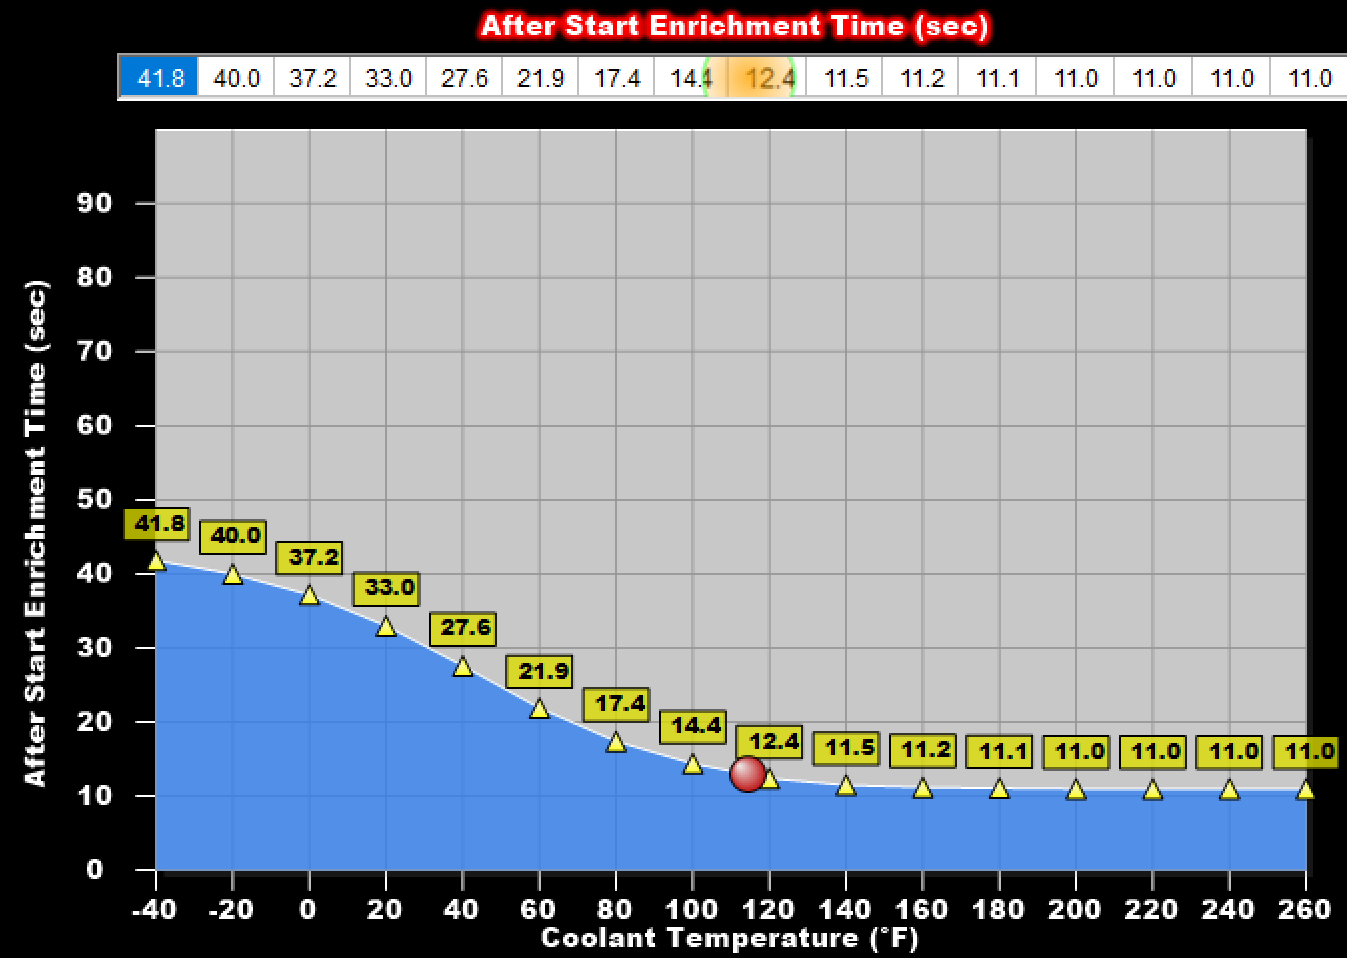
There exists an engine speed above which the ECU assumes the engine is “running” as opposed to “cranking”. This is the “crank-to-run” RPM. The default for these systems is 400 RPM. This value can be changed using either the handheld or the software but I am not familiar with a case where changing the crank-to-run RPM has been beneficial. What is important is that you understand what happens at this point. Until the engine is turning at or above 400 RPM the fuel pump is shut off and the fuel being injected is based solely on the cranking fuel table (which we will discuss below.) Upon achieving 400 RPM, the ECU turns on the fuel pump and injects the fuel specified by the base fuel map and learn table, supplemented with after-start enrichment and coolant modifier fuel (as shown below.)
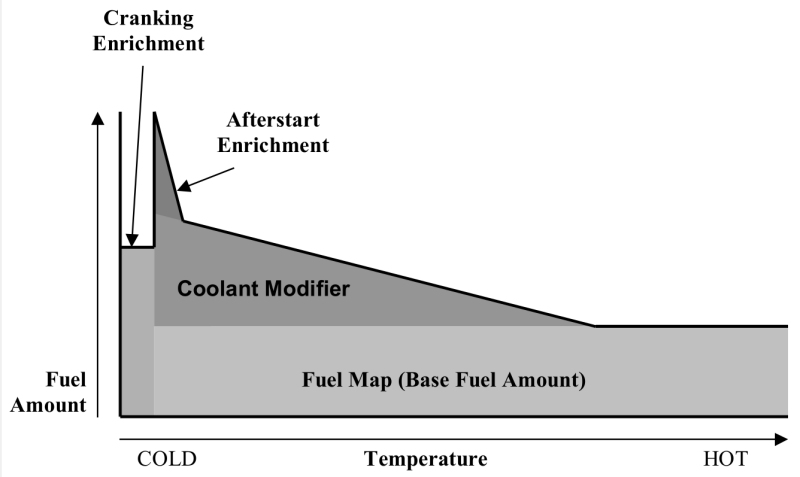
The chart above is a little misleading since the word “Temperature” at the bottom seems to imply that the x-axis is temperature. That is not the case. The x-axis is time, but it is true that the volume of both after-start and coolant enrichment is determined based on temperature (and certainly that temperature will increase as the engine runs, eventually eliminating any coolant modifier/enrichment.) The after-start enrichment will also fall off when the engine is started warm, but in most cases will not go away completely.
Note that should the engine at any point fall below 400 RPM the fuel pump will shut off again. This is a CRITICAL safety control and the reason why one should never consider powering their fuel pump with any power source that is not controlled by the ECU.
Step One: Tuning Cranking Air (IAC Park Position, IAC Startup Hold Time, and IAC Startup Decay Time)
The engine needs a certain amount of air during cranking in order to be able to start. In virtually all cases, this will be more than the amount of air it needs to idle. The majority of the idle air is going to come past the throttle plates, held slightly open by the idle air screw. Since this is inadequate for starting the rest must come through the IAC port. That amount of air is determined by the IAC Park Position.
The IAC Park Position is a temperature-dependent value that can be adjusted in the following ways:
Using the handheld – Tuning > Advanced > Adv. Icle > IAC Startup > IAC Park Position
Using the software – Idle ICF (tachometer icon) > IAC Parked Selection
IMPORTANT NOTE: After each variable referenced in the article below I will mention the way to access those variables using the handheld controller and the software. Then I will provide an image of how this variable looks in the software. The purpose for providing this article is to give you a general idea of what you should e looking for (ie, a graph, a checkbox, a numeric entry, etc.) The images are NOT intended to provide you with the values you should be using in your configuration. In fact, they may be terrible values when applied to your engine. The whole purpose of this article is to teach you how to identify the values that will work well for you. It turns out that in EFI , as in life, there are no shortcuts to excellence.

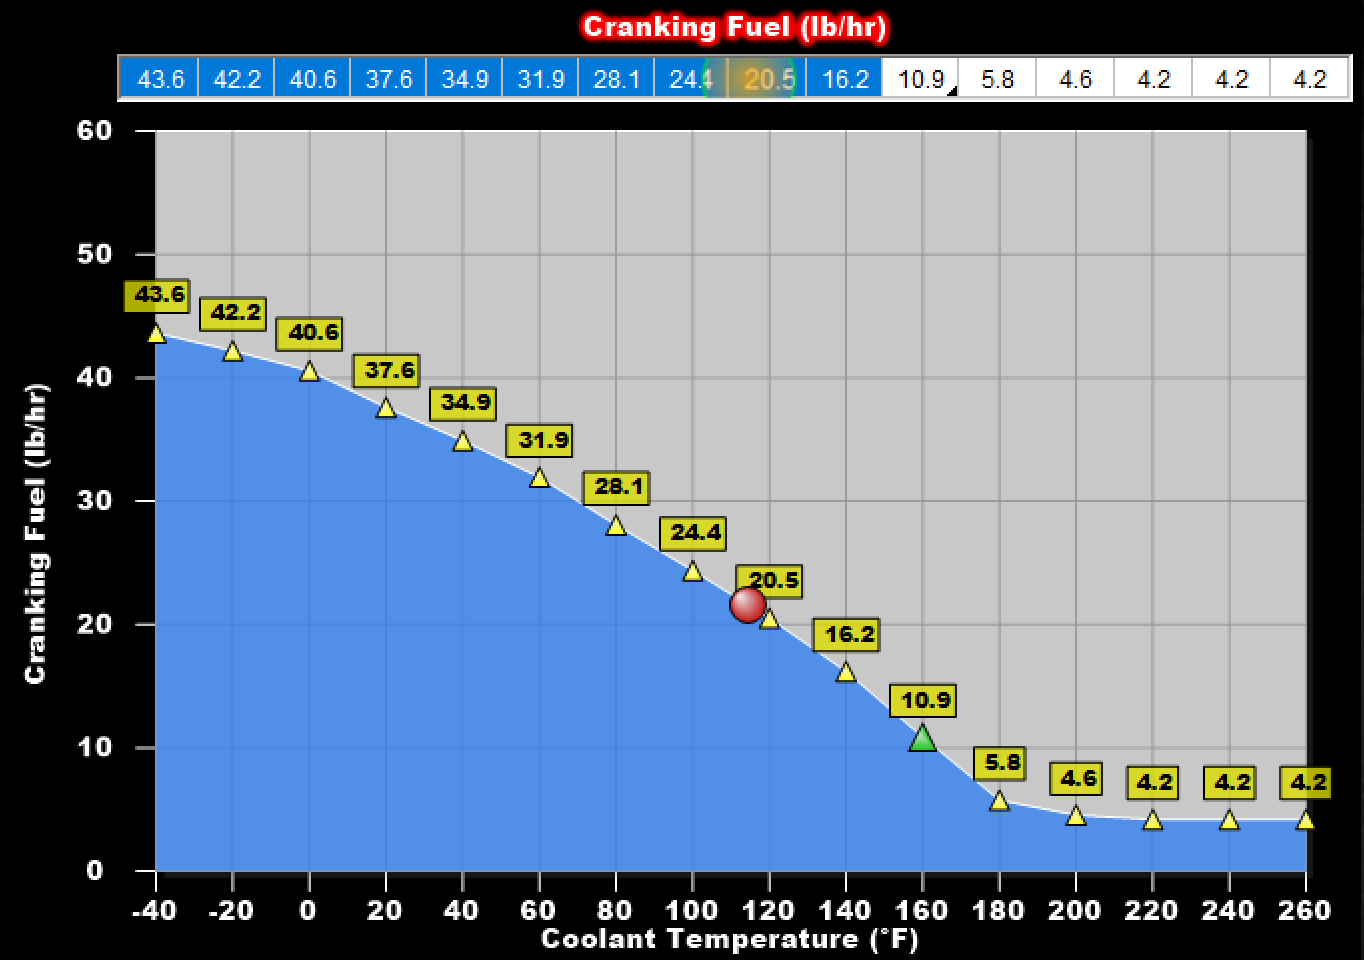
Whether you tune via the handheld or software you are provided with a graph showing IAC parked position at the left and coolant temperature across the bottom. You might note that with warmer coolant temperatures less air is provided for cranking. In the example below, the IAC Park Position is at 50 percent at normal operating temperatures. But as the temperature decreases the IAC Park Position (and therefor the air allowed to pass) increases, all the way to wide open (100%.)
There is very little downside to having IAC Park Position be too big. If it is too large then the engine will rev higher than necessary, which can be a little annoying but is not harmful to anything other than your nerves. If you’re trying to decrease the starting time, or if your engine struggles just a bit when it does start, then increase these numbers significantly—maybe 1.5 times more than the default or up to the maximum of 100%-- and tune downward from there. This is a value that you don’t have to nail the first time you try it. Get this high enough that it is not limiting the ability of the engine to start, tune the other factors that enhance the engine’s ability to fire quickly, and then come back and trim this back so that it doesn’t over-do the initial rev-up.
Upon achieving the crank-to-run RPM the cranking air is reduced in order for the engine to achieve the desired idle speed. Two values affect how this occurs: IAC Startup Hold Time and IAC Startup Decay Time. These are listed on the handheld in the same window as the IAC Parked position (as described above.) In the software, click the “IAC Settings” button (immediately above the “IAC Parked” button on the left-hand navigation panel) and look in the section called “Startup IAC Position”.

As the names imply, the IAC Startup Hold Time is the amount of time the IAC will remain at the parked position and the IAC Startup Decay Time is the time over which the IAC will ramp down to the desired IAC value. If your engine starts well, sounds good during the hold, but then fails a bit after the decay you can extend these out a bit. Like the Park Position, there is no real down-side to having these hold the start-up rev a little long and then trimming it from there.
Cranking Fuel Variables
While setting the cranking air is simple (add a bunch and then tune it back where it doesn’t over-rev) setting the cranking fuel is a bit more challenging. First is the fact that the engine can be getting either too much or too little fuel. Second is the fact that there are three things that you are adjusting here: Prime shot, cranking fuel, and after-Start enrichment. Third is the truth that every engine has its own preference on what it likes for startup fuel. Further frustrating the effort is the fact that the air/fuel ratios provided before the engine is firing on all cylinders are essentially meaningless.
Step Two: Tuning the Prime Shot (Fuel Prime Percentage and Fuel Prime Multiplier)
Start by going after the fuel prime shot—the amount of fuel injected into the engine before cranking begins. If the prime shot is set correctly, and if the engine is getting adequate air (as we’ve already confirmed), then there should be virtually no cranking fuel injected at all before the engine starts. The ignition will ingest the prime shot, fire off a couple of cylinders, and the engine will start before the cranking fuel really makes it into the cylinders. That’s what we want, right?
Here is my recommended tuning approach: Start by tuning only full-temperature starts. Why? Because that is very repeatable. Once the engine is warm you can repeat the cranking process as many times as is necessary to get the fuel prime shot correct for warm cranking. Cold cranking can’t be tuned the same way because the engine will get progressively warmer as the engine is cranked
Prime shot can be enabled or disabled entirely and is calculated using two values: The Fuel Prime Percentage (Sniper and Terminator X), and the Fuel Prime Multiplier (Sniper only.) These settings will be instrumental to a fast start. Default values on these are 150% and 5, respectively. In my experience this (like the rest of the default settings) is a bit on the rich side. However, each engine is different. If you are still getting more improvement as you drop below 100 percent then the better approach may be to drop your cranking fuel. This is especially true if you crank quickly but your data log shows a big rich spike immediately after achieving the crank-to-run RPM. Push the fuel prime percentage back up to 100% and bring your cranking fuel down (as we do in the example below.)
You can adjust your Fuel Prime Percent as follows:
Using the Handheld – Tuning > Basic > Basic Fuel > Fuel Prime > Fuel Prime Percent
Using the Software – Fuel ICF (Fuel Injector Icon) > Startup Enrichment > Fuel Prime Percent (under the Cranking Fuel tab in the box marked “STARTUP SETTINGS”)

Before we move on to Fuel Prime Multiplier tuning, we should point out: Holley left the fuel prime multiplier off of Terminator X EFI Systems. Fuel Prime Multiplier is primarily a benefit to throttle-body based EFI systems. Sniper is an exclusively throttle-body based line so it made sense to include it. Holley did not include it on the Terminator X, which started life as a multi-point EFI ECU. Maybe Holley will add Fuel Prime Multiplier to Terminator X later. Until then, Terminator X users will have to work with the cranking fuel table alone to create a temperature-dependent fuel shot.
Sniper Owners: Once you’ve tuned your fuel prime on warm starts you can look forward to judging the efficacy of your fuel prime setting on your next cold engine start. And it may have improved—or it may have gotten worse. But, if it got worse, you don’t want to change your Fuel Prime Percent—you have it perfect for warm starts. So now you’re left with tuning the Fuel Prime Multiplier.
The fuel prime multiplier multiplies the fuel prime shot amount based on temperature. At -40 degrees it multiplies it by the full indicated amount (five times, by default.) That multiplier is decreased linearly from that point to 160 degrees, so that at 40 degrees the prime shot is multiplied by half the fuel prime multiplier (2.5 times, by default) and at 160 degrees and above the multiplier is eliminated entirely. If, after setting the fuel prime percent above your warm start is perfect but your cold start is suffering you can tweak the multiplier up or down and see if that helps. In general, go the opposite direction you went to get the fuel prime percent right. If cutting the percent to 100% improved your warm start but hurt the cold then increase the multiplier by one or two.
(Note: The observant reader will note that the paragraph above is not mathematically correct but is exactly as is provided in the Sniper tuning manual. The mid-way point between -40 and 160 degrees is 60 degrees, not 40 degrees. Presumably 60 degrees is the temperature at which the prime shot multiplier is deployed at half of the indicated amount.)
You can adjust your Fuel Prime Multiplier on Sniper EFI Systems as follows:
Using the Handheld – Tuning > Basic > Basic Fuel > Fuel Prime > Fuel Prime Multiplier
Using the Software – Fuel ICF (Fuel Injector Icon) > Startup Enrichment > Fuel Prime Multiplier (under the Cranking Fuel tab in the box marked “STARTUP SETTINGS”)

Step Three: Tuning Cranking Fuel
As mentioned above, if you get the prime shot dialed in perfectly you hardly use cranking fuel before achieving the crank-to-run RPM. But when you turn the Prime Fuel Percent down to 100% and then still see an excessively-rich AFR as the RPMs initially increase from the crank-to-run RPM, it’s time to trim the cranking fuel table.
Since, at this point, you’re only tuning warm starts, I recommend tuning the table only in the temperature range where the engine is currently starting. Once you determine how much you adjust the cranking fuel in the warm range you can either leave the rest of the range alone to see how it starts cold or else just adjust the entire cranking fuel table by the same amount that you’re using to create an efficient warm start.
Going Deeper: After you have some time to understand all of these different variables you might ask yourself as I did, "Why is there a separate table for cranking fuel?" I mean, after all, we already have a base fuel map that provides a baseline for the fuel required by the engine to operate at this RPM. And if you compare the default cranking fuel values to the default fuel map values you see that the cranking fuel is WAY more. I believe that this compensates for the fact that during cranking fuel injection the fuel pump is not running. Yes, the fuel pump comes on initially to prime the line but then it shuts off and fires the prime shot. You'll note that the pressure drops at that point. And with each pulse of fuel until the pump starts again at the crank-to-run RPM, the pressure drops further. Cranking fuel lets us compensate for that drop in pressure. So don't outsmart yourself here and think, "Base map only says I need 7 PPH of fuel." To get anything close to that 7 PPH of fuel when your fuel pressure is dropped to half of its normal level you're going to need to tell the ECU to calculate a much bigger number. Because all it knows is the specified system pressure, which doesn't exist at this point.
Tune the cranking fuel in the following locations:
Using the Handheld – Tuning > Advanced > Advanced Fuel > Cranking Fuel
Using the Software – Fuel ICF (Fuel Injector Icon) > Startup Enrichment > Cranking Fuel
Step Four: Tuning After-Start Enrichment
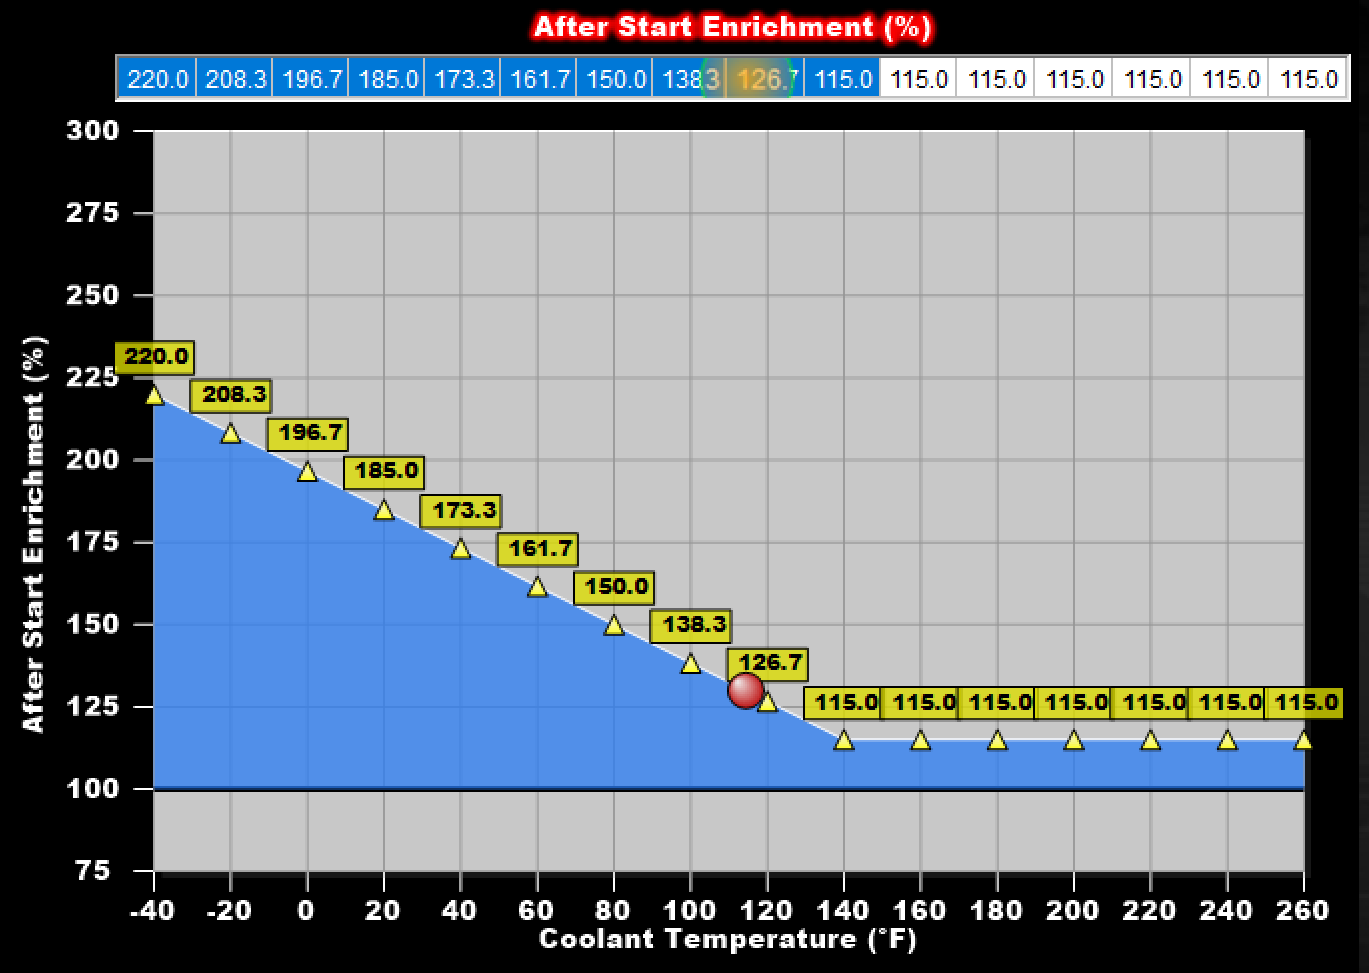
Upon initial start-up the engine typically needs a bit more fuel than is provided by the fuel table. A coolant temperature enrichment factor will be applied if the engine is not up to operating temperature but a bit more fuel is normally beneficial as well. That added fuel is called after-start enrichment.
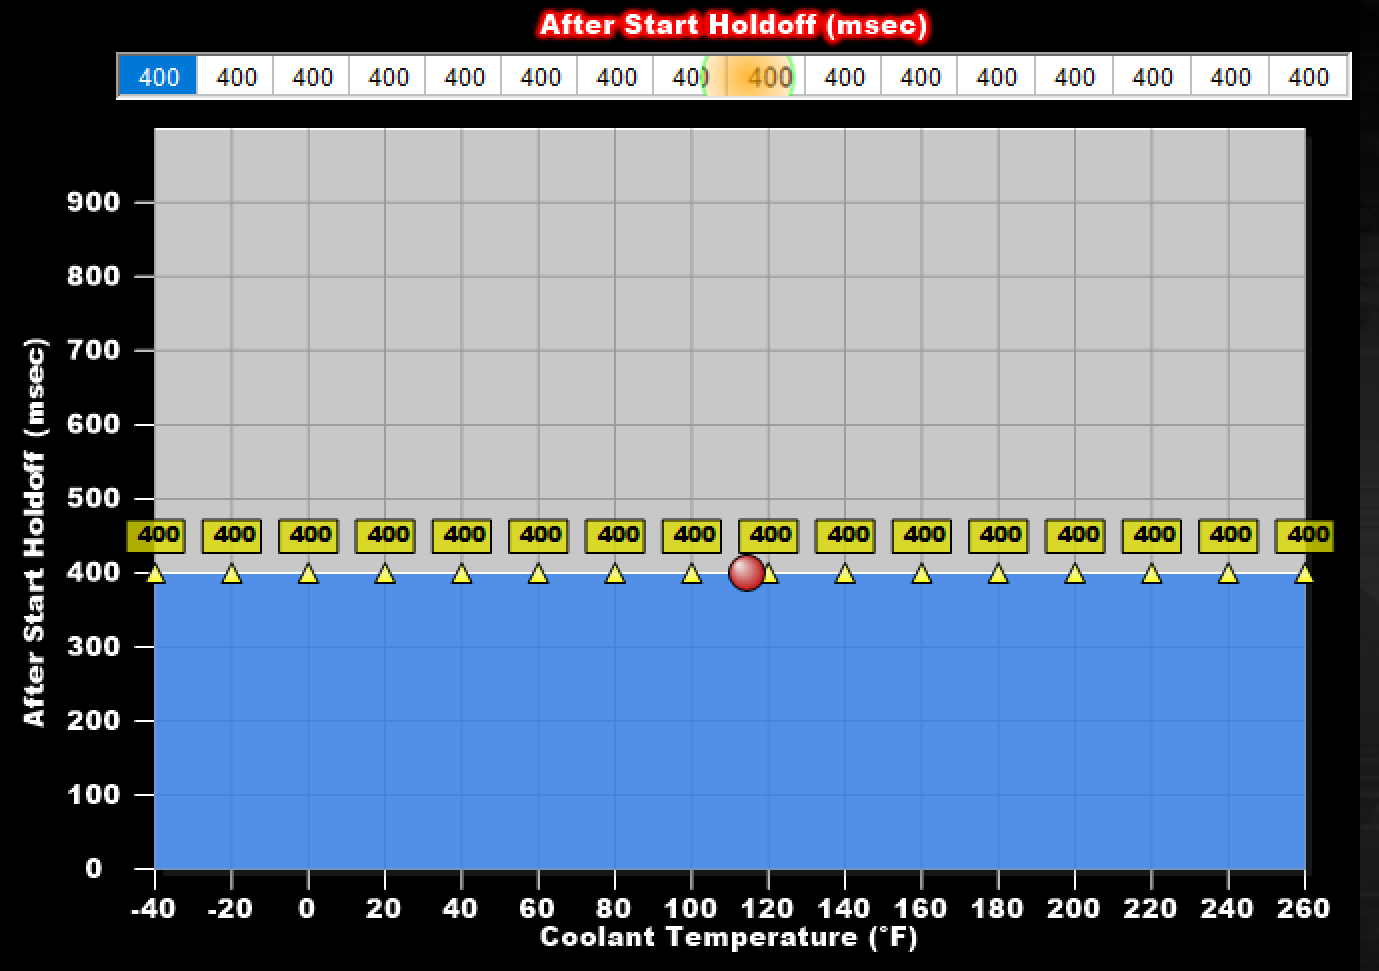
After-Start enrichment tuning is even more multi-faceted than cranking fuel tuning. First, remember that after-Start enrichment is not a fixed value. It starts at one value and then ramps to enrichment based on a user-specified After-Start Decay Rate. Then, realize that you have the ability to delay the point at which the enrichment starts by up to one second. That delay is called After-Start Holdoff. Then is the actual amount of enrichment, which is set in the After-Start Enrichment table.
You can adjust your after-start enrichment values in the following locations:
Using the Handheld – Tuning > Advanced > Advanced Fuel > After-Start Fuel
Using the Software – Fuel ICF (Fuel Injector Icon) > Startup Enrichment > After Start Decay Rate tab (Also called After Start Enrichment Time)
Using the Software – Fuel ICF (Fuel Injector Icon) > Startup Enrichment > After Start Holdoff tab
Using the Software – Fuel ICF (Fuel Injector Icon) > Startup Enrichment > After Start Enrichment tab
Other Startup Pointers
O2 sensor readings are meaningless until the engine has crossed the crank-to-run RPM threshold (400 RPM by default.) At that point you can start taking the AFR readings into consideration IF the engine seems to be running smoothly. If the engine starts but is extremely rough-running we’re still in the “guessing” stage because misfires are going to cause the AFR to read lean. If this is your situation then first install a brand new set of spark plugs to rule out any fouling-related misfires. Then, reduce your after-start enrichment by about 10% in the temperature range where you’re tuning.
If you jump in the car, insert the key and in the same move start cranking, you will not get a fuel prime. Your engine will be dependent on cranking fuel entirely. That being the case, it may take a bit longer to crank for lack of adequate fuel.
Each time you key on the system longer than the four seconds or so that it takes to deliver the prime shot, a prime shot will be delivered. Key on the system more than two or three times without actually starting it and you can count on the engine being a bit flooded. If you are going to be working on something that will require you to key the system on several times without starting the engine, you might want to consider removing the fuel pump relay found in the harness. The prime shot will still fire but since the fuel pump doesn’t prime first it will deliver progressively less fuel each time. Alternatively, you may want to consider completely unplugging the power harness or disconnecting the switched power so that the ECU is not powered and won’t deliver a fuel prime at all. (Don’t forget and then later wonder why it won’t start!)
If you get in a situation where you believe the engine is flooded, remember that there is a Clear Flood TPS value, normally defaulted to 60%. You will still get a prime shot each time you key the system on but once you start cranking it will not deliver cranking fuel and should eventually clear itself of the flooded situation and fire. Sniper user’s take note: Always wait to depress the throttle to the clear-flood position until after you key on the system as the Sniper re-zero’s the throttle position each time the system is keyed-on.
Tuning Example
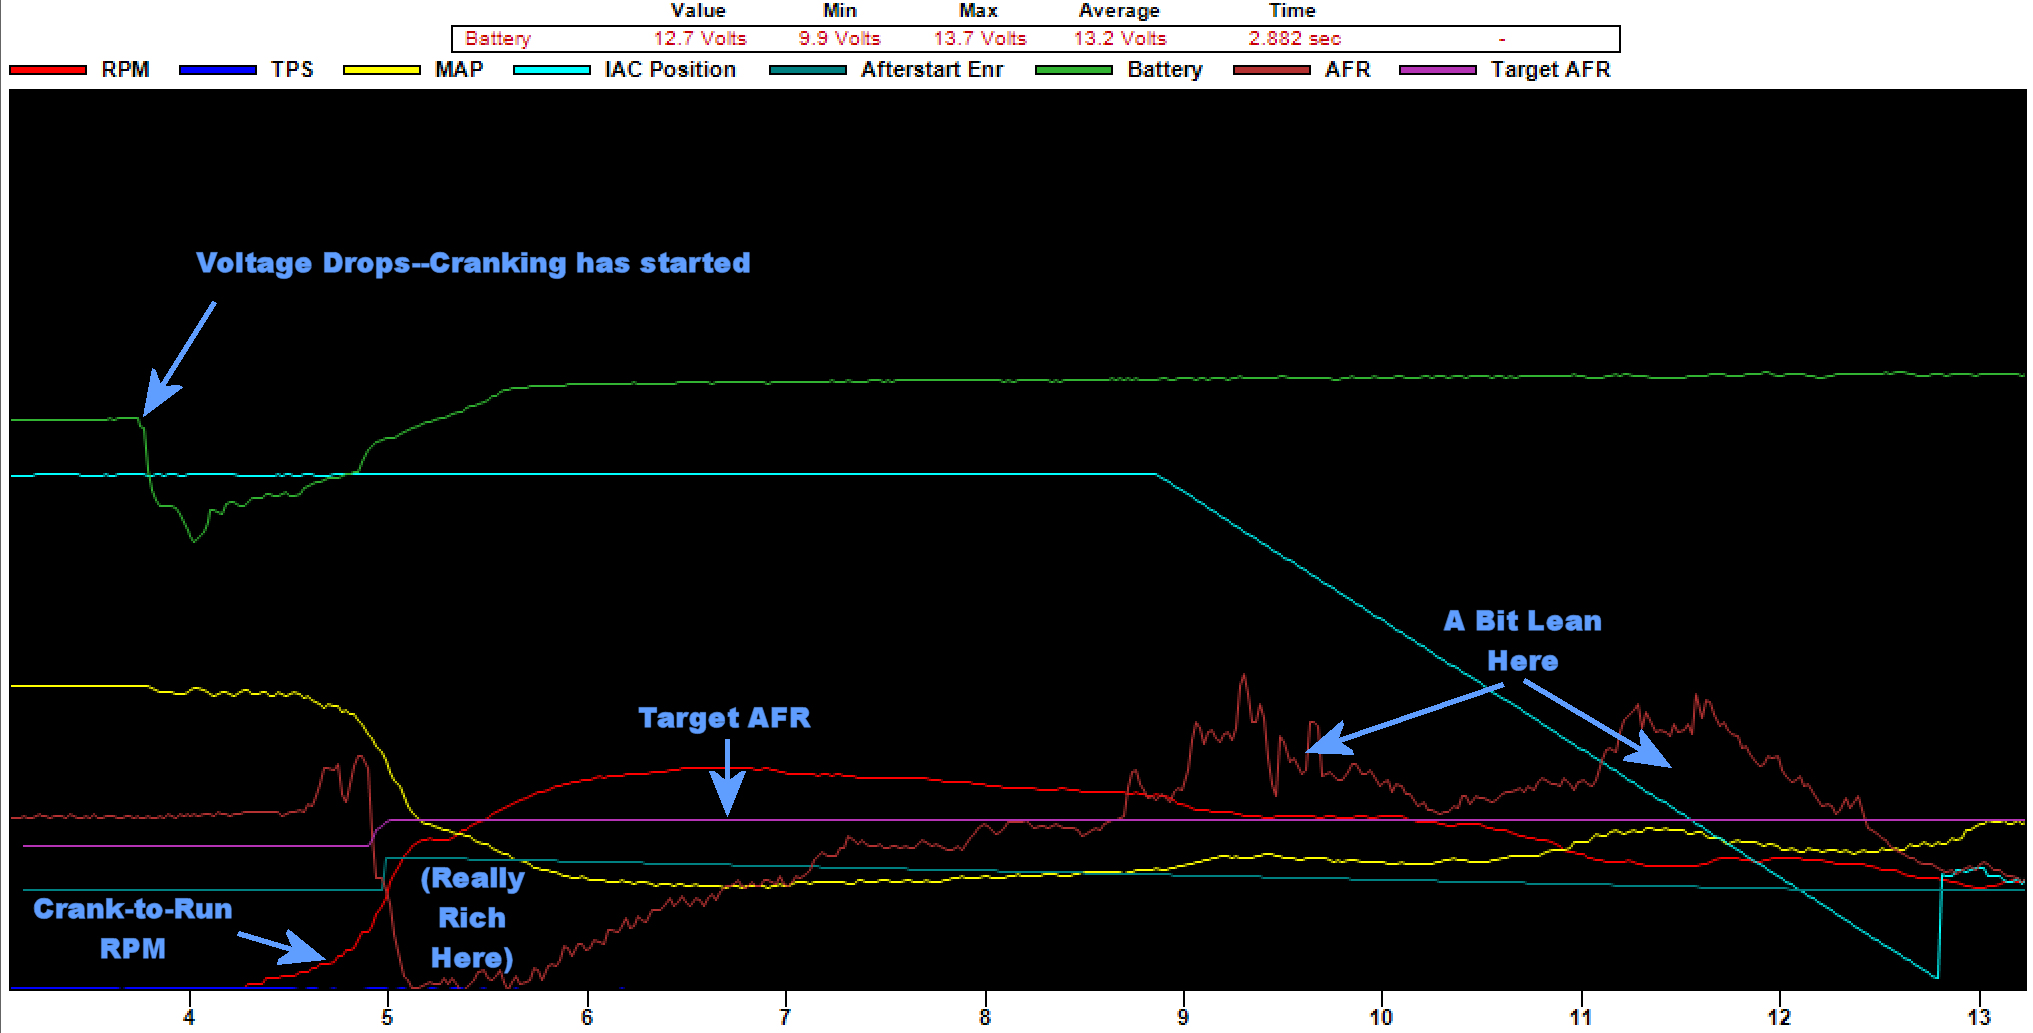
Words only go so far so I thought I’d include a tuning session to give you some idea of what’s going on here. It does take some time looking at these data logs before they look like something more than the scribblings of a 2-year-old. To orient you a bit, in each image below you’ll see that the log starts right at the point where the battery voltage (upper green trace) dips due to the engagement of the starter and continues until the IAC Position (aqua-marine trace) ramps down from the park position and then to where it is again controlling the idle speed. Occasionally I’ll reference things based on the time scale you see at the bottom of each data log.
A key at the top of each log shows the signals associated with each color. Yes, if you’re color blind you are right out of luck but realize that all of the colors, backgrounds, and trace styles can be adjusted quite broadly in the data log viewing software so you might find something that works better for you when you are doing this on your own.
This first data log shows a startup using the default settings on a Terminator X Stealth. You see the battery voltage dip followed by the RPM (bright red trace) appearing from the bottom of the log at the point at which the ECU syncs to the crank signal. Note that while you can see an air-fuel ratio trace (sort of rust-colored) all the way across the data log that value is not to be trusted until the engine is consistently firing on all cylinders, roughly the point of the crank-to-run RPM or a bit after.
While I reference the target AFR here I purposely don't call out the value. Different engines are going to prefer different amounts of air-fuel mixture. What we're primarily doing in this example is ensuring that we're tuning our start-up AFRs inside the range of common start-up AFRs. Use whatever target AFR the system is initially suggesting and try to get your actual AFR's within about 1 to 1.5 of that value. Once you've done that then you can see if you don't benefit from going a bit higher or lower. Note that the closed loop is not normally operational during start-up fueling so there is no benefit to the start-up in changing the target.
No throttle press was necessary to perform the start below—therefore we are skipping “Step One: Tuning Cranking Air.” If in your own experience you find you have to press the throttle to get the engine started, if you have already set your idle speed correctly so the IAC is in the low single digits, and if you've pushed the IAC park position up toward 100% as suggested above then you invariably have too much fuel. Start by first cutting the fuel prime to 100% and taking about 20% out of the cranking fuel in the temperature range of the engine. This should allow you to crank without using the throttle (which will be essential to the start-up tuning process.)
Click To Enlarge
Let’s note for the record that the time from power on starter solenoid to achieve crank-to-run RPM is 1.13 seconds. Not bad but maybe we can improve that. We do see a massive rich dip in the AFR as soon as engine starts. Continues rich and then goes a bit lean.
What this tells us: First, we don’t have any huge problems. It starts fairly well. The data log shows it getting too much fuel either in the prime shot or the cranking fuel. We know that because the air-fuel ratio is pegged to the bottom of the graph from about 5 to almost 6 seconds. A low air to fuel ratio means the mixture is rich. You see that the AFR trace is ar below the target AFR (pink trace.) Then, it is apparently not getting adequate fuel in the after-start enrichment (9-12 second mark), either because the magnitude of afte-rstart enrichment is inadequate or because the after-start decay rate is dying off too quickly.
I always recommend fixing one thing at a time. Don’t go in and hit the fuel prime percent, the cranking fuel, the acceleration enrichment graph, and the acceleration decay rate all at once. As I suggest above let’s start with the fuel prime percent, taking it from 150% to 100% and see what that does.
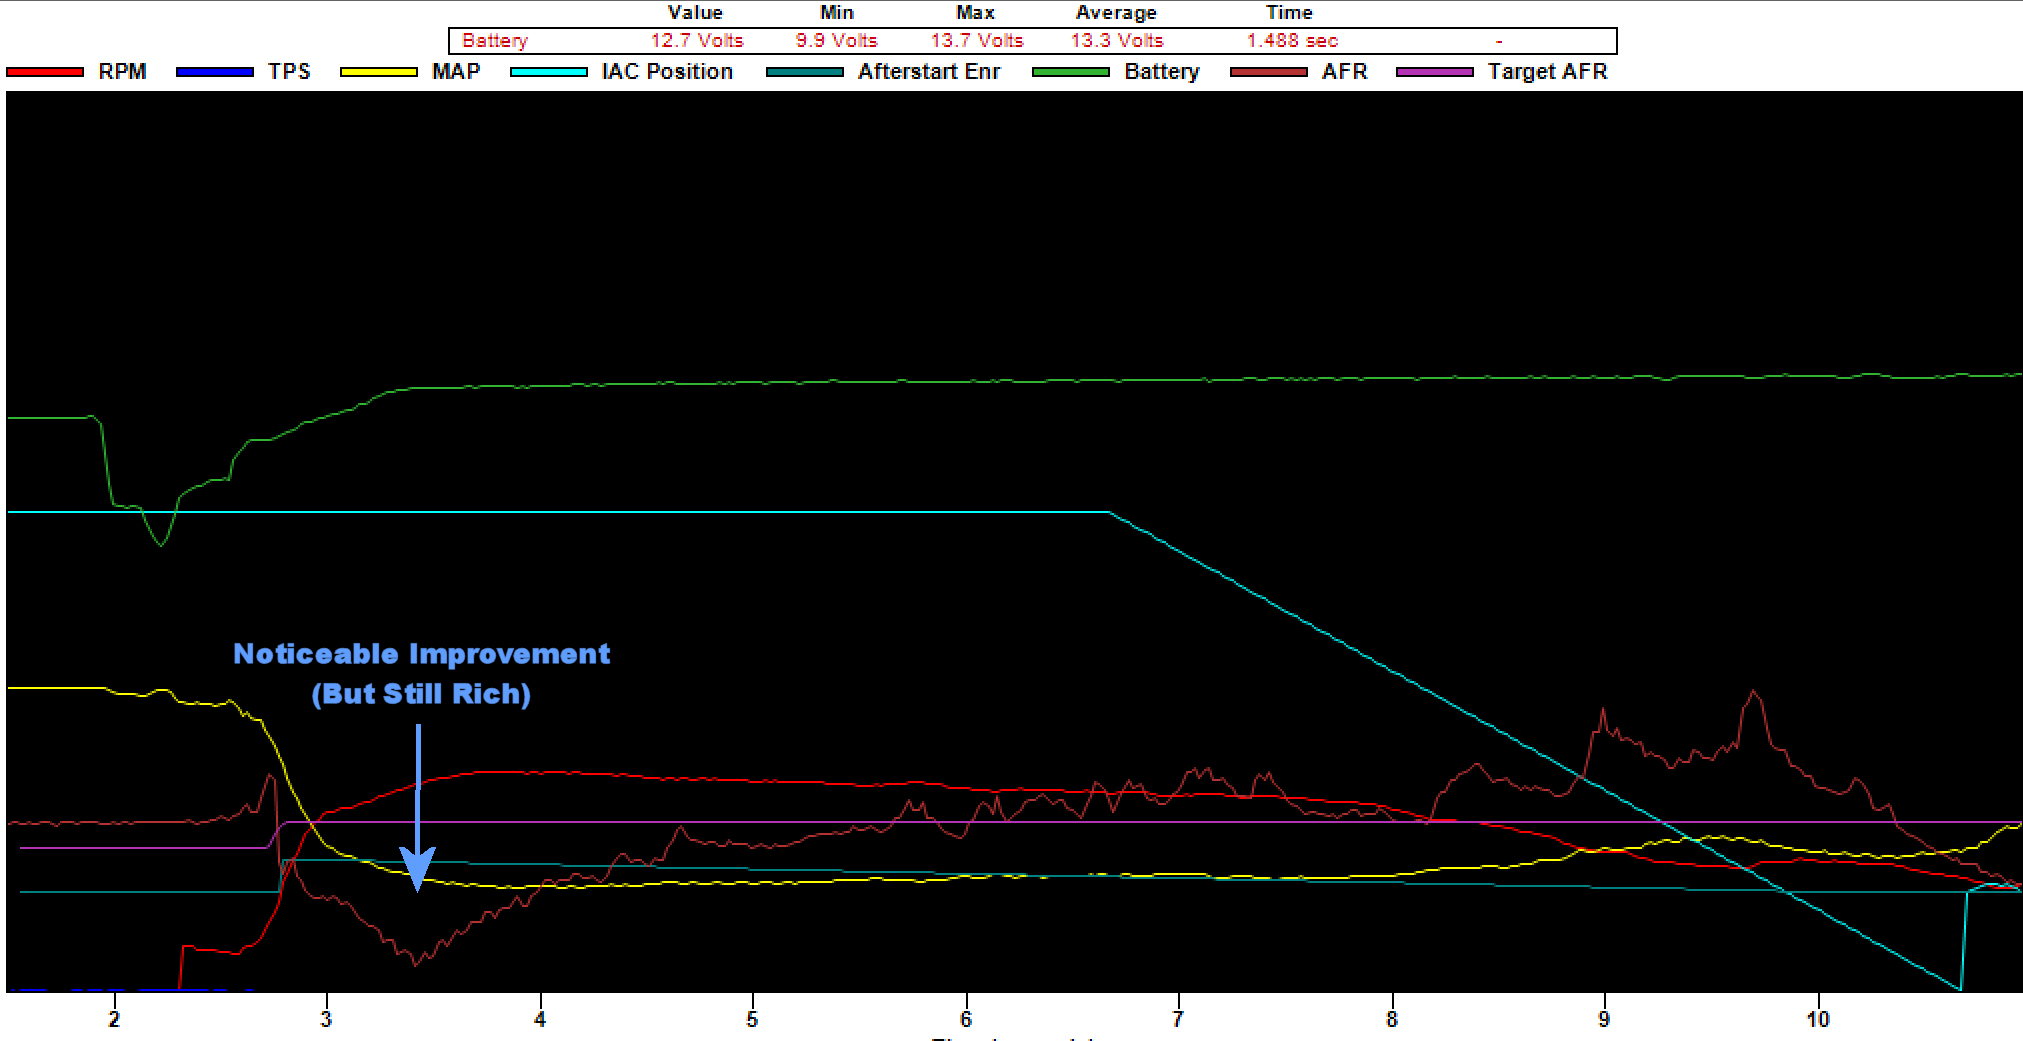
That helped. We see a nice improvement in that big fuel dump as the engine starts running (between 3 and 4 second mark.) Will going further help more? Let’s try 75% on the fuel prime.
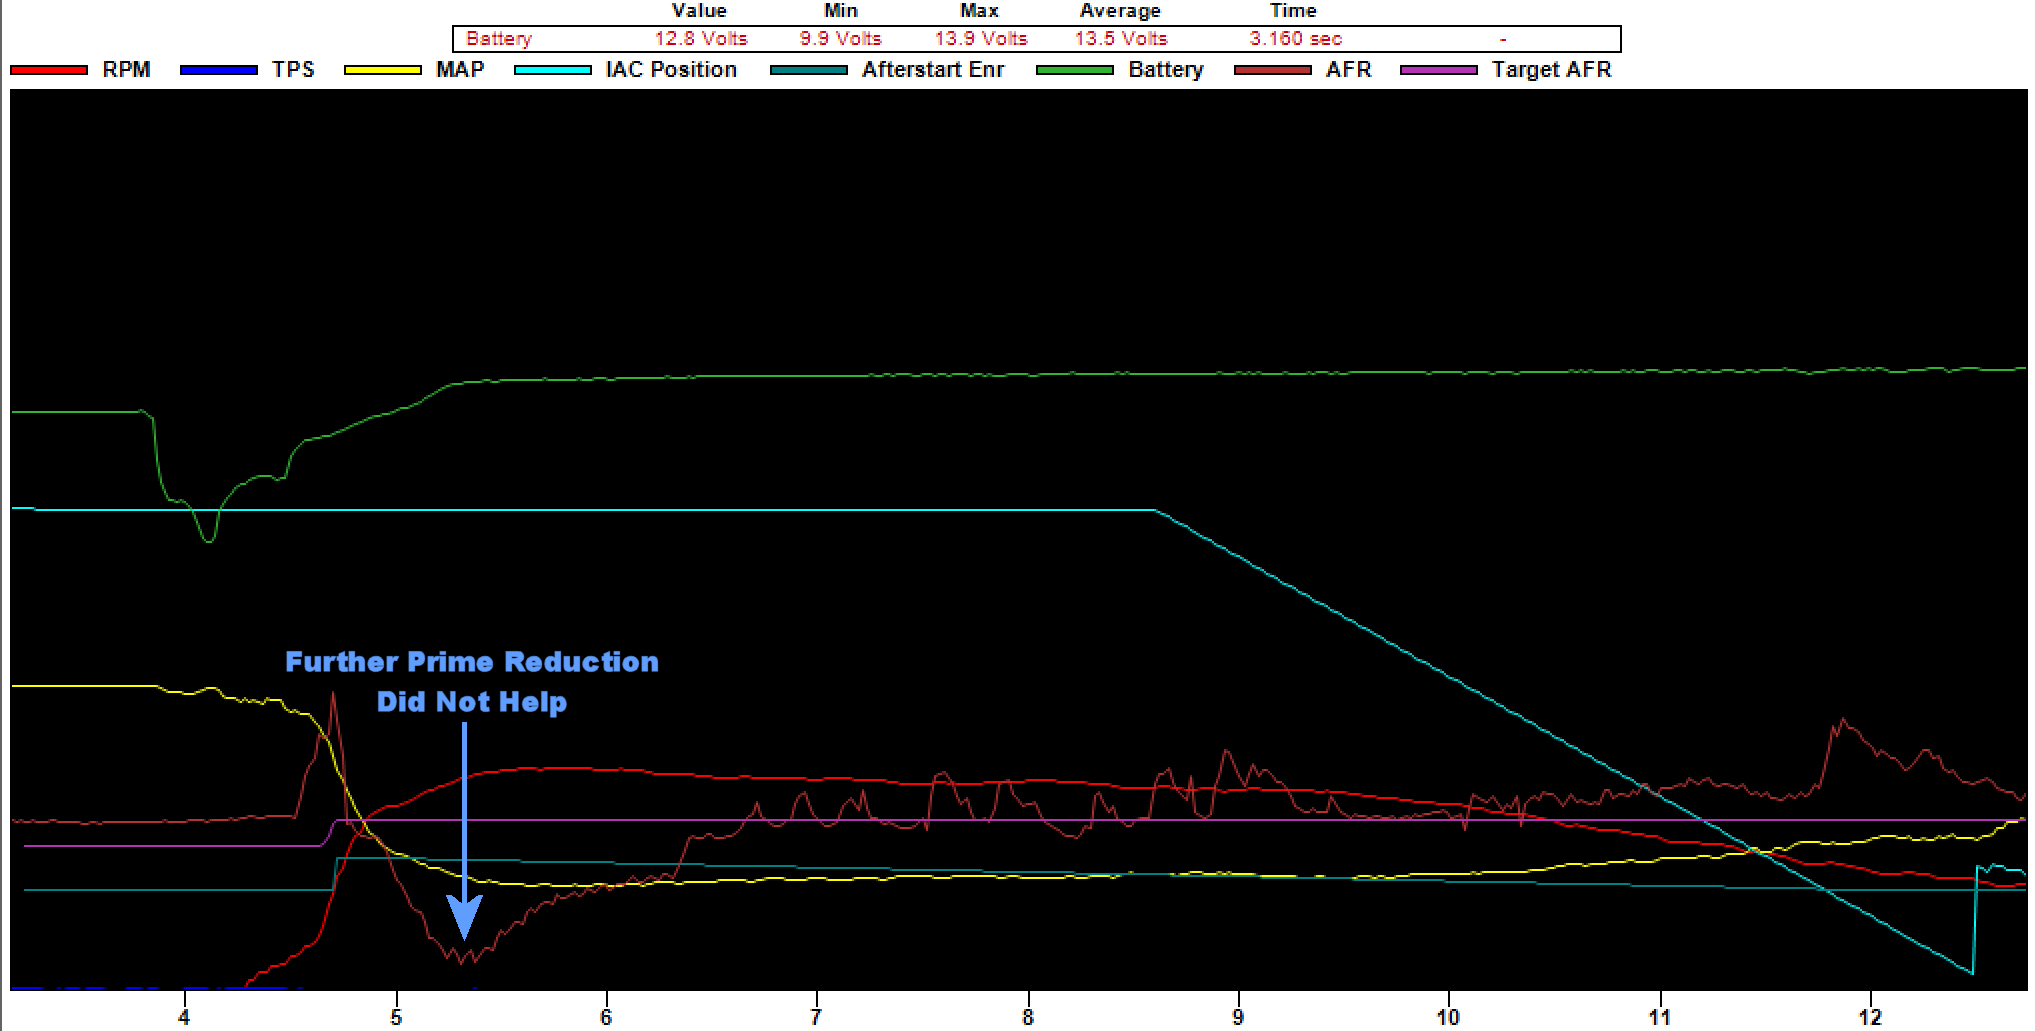
No, it did not help. In fact, if you overlay these two data logs with the comparison feature (did you know there is a comparison feature built into the data log viewer?) you will observe that they are almost IDENTICAL when it comes to AFR. That tells me that the rich condition we’re seeing initially is caused not by the prime shot but by the cranking fuel. Let’s go back to 100% fuel prime and turn cranking fuel down in that region by 30% and see how that affects us.
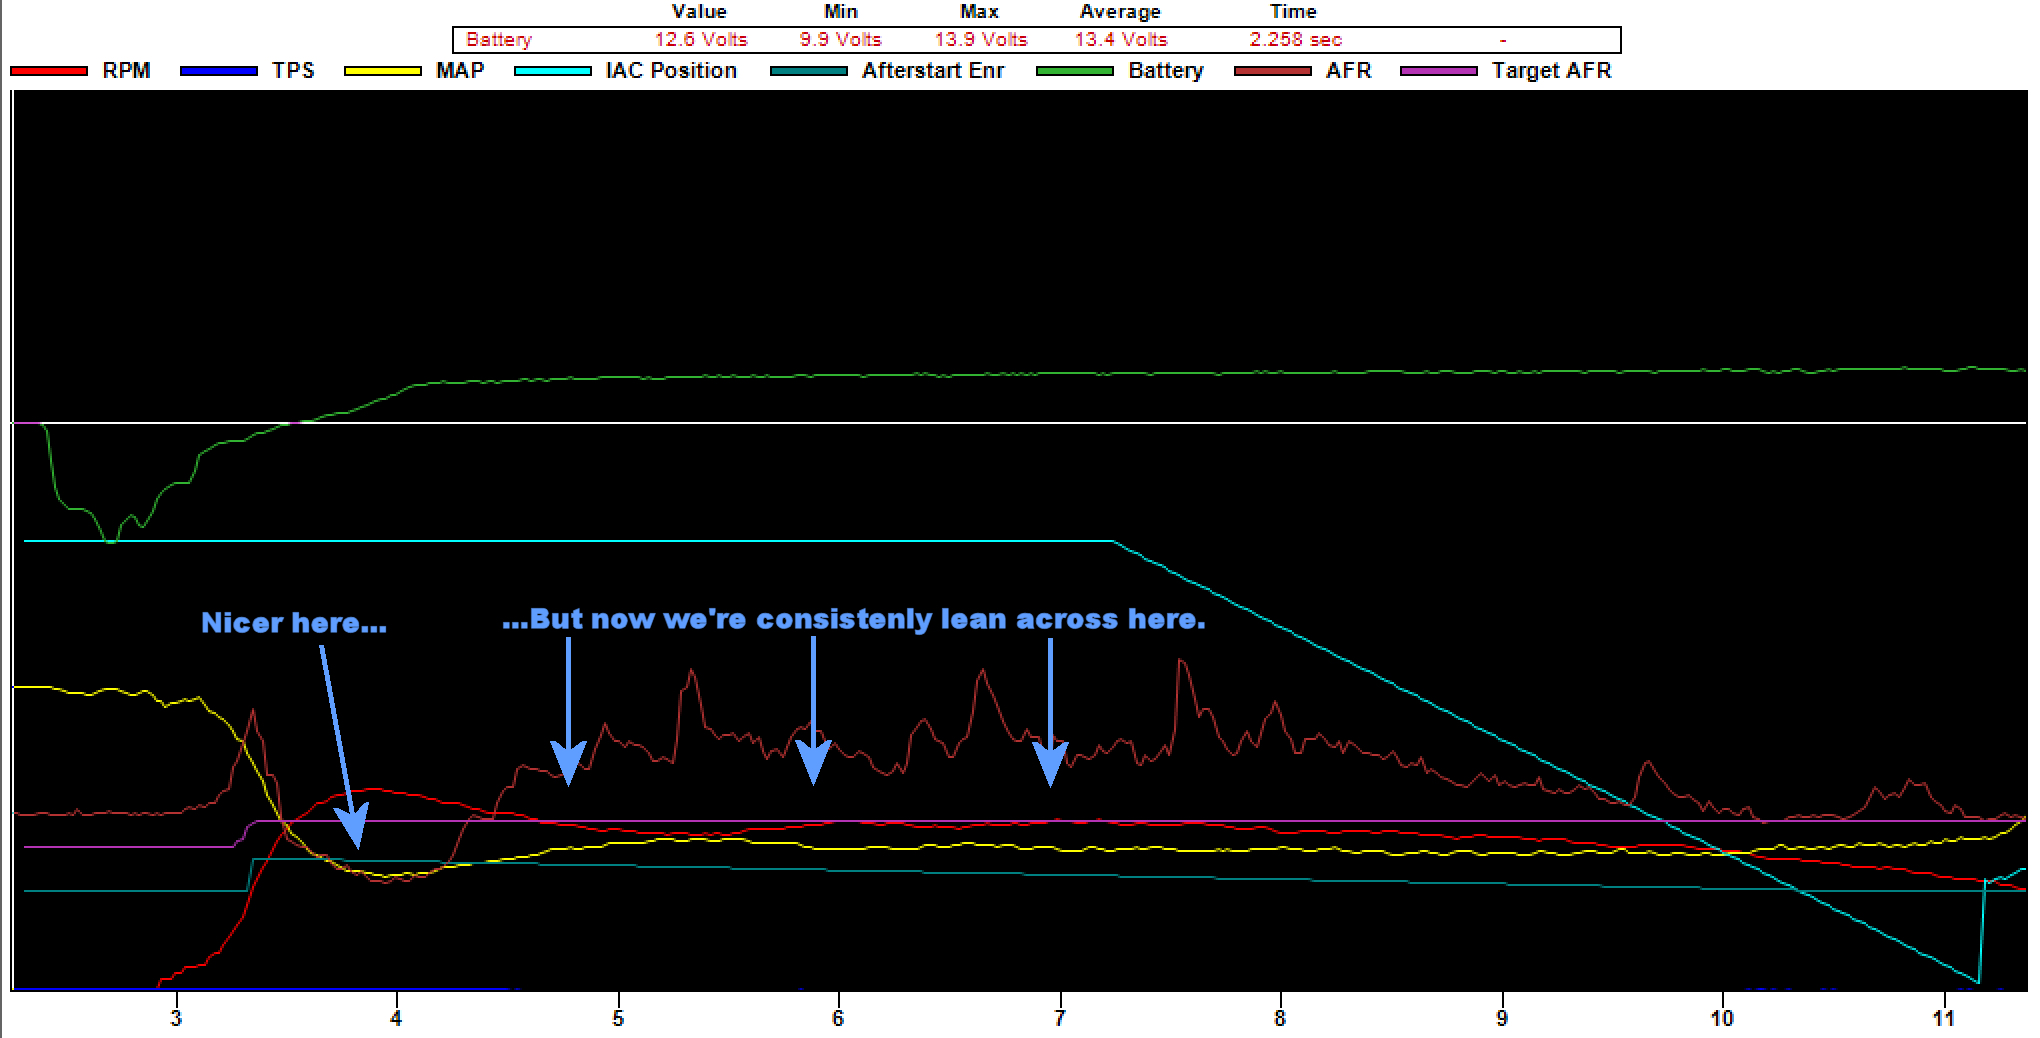
Now we’re getting there. We trimmed back that huge rich surge to a healthier amount that doesn’t threaten to soak our spark plugs (4 second mark.) But we’ve also introduced some leanness from 4-10 seconds. We can adjust that with the after-Start enrichment—I’ll bump that up a bit. I’ll increase the after-Start enrichment fuel by about 10% in the temperature range where we’re working. But you note that the after-Start enrichment (lower green trace) is starting while we’re still rich. Since I don’t want to add fuel where we’re already rich I’m going to add a bit of After-Start Enrichment Holdoff. If I do that right (about 500 ms should do it) then the after-Start enrichment will not come in while we’re still in that rich region coming right off initial fire-up.
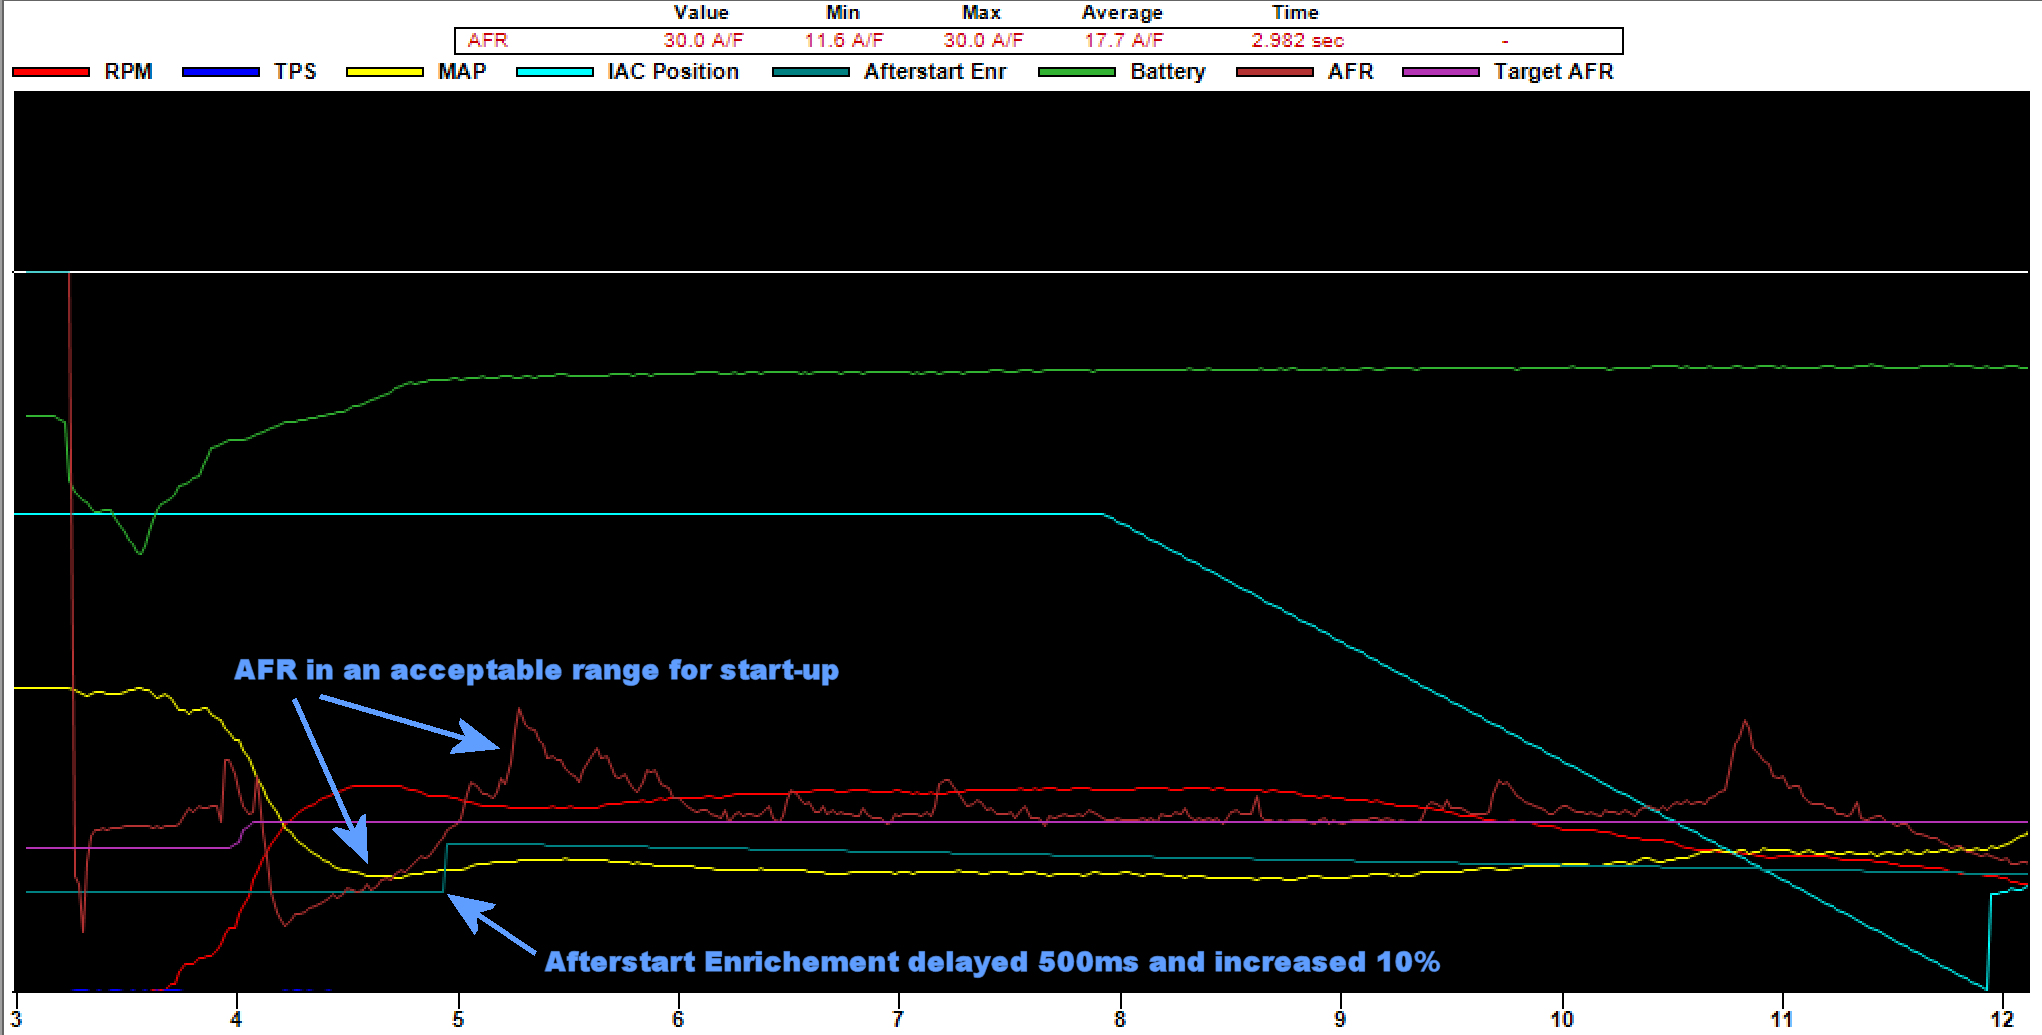
Not perfect but not bad. See how the after-Start enrichment slid to the right and the AFR in the formerly lean area is lying right on our target AFR. This is a huge improvement over what we got initially. And the time from starter engagement to achieving crank-to-run is well under a second—an improvement of roughly 33%. And that from a not-so-shabby original 1.13-second start time. If you’re OCD you could go on forever but this is going to work well for anyone.
Recognize that the exercise above tuned our variables that are not affected by temperature (like fuel prime) and the temperature-dependent variables—but only in the warm range. As a result, this same engine may not start well cold. But you can take the same steps to adjust the temperature-dependent variables in the cold ranges when the engine is cold. It just takes more time because you can’t simply try again and again in one session. The engine warms up a bit each time. But with patience you will get there.
 +
+ +
+ +
+ +
+


10 Comment(s)
Awesome Article. Super helpful. The way you write makes it so easy to understand. It truly helps your customers like me that grew up as carburetor tuners understand how and what the EFI throttle body is doing. Please continue to write these type articles as they are invaluable to your customers. Thanks Chris, keep up the good work.
Thanks for the kind words, Tony. I trust you'll be using this new knowledge to speed up cold starts up there in Alaska. Enjoy!
One thing didn't make sense to me. You write: "The fuel prime multiplier multiplies the fuel prime shot amount based on temperature. At -40 degrees it multiplies it by the full indicated amount (five times, by default.) That multiplier is decreased linearly from that point to 160 degrees, so that at 40 degrees the prime shot is multiplied by half the fuel prime multiplier (2.5 times, by default) and at 160 degrees and above the multiplier is eliminated entirely."
Wouldn't the prime shot be half (2.5x) at 60 degrees and not 40 degrees? Am I following this correctly or not? i.e., 5x at -40 and 0 at 160. That's a spread of 200 degrees so half of that would be 100 degrees. Therefor, -40 + 100 degrees = 60 degrees. Is that correct?
Nice catch, Ken! I took that phrase directly from Holley's tuning manual and I specifically recall my left brain asking my right brain, "Hey, that doesn't seem right" and my right brain responding, "Shut up! I'm trying to get this article done. Holley knows how to do math!"
I've edited the article with a note about the difference.
Chris is my go to for any issues that arise with my sniper. Quick to respond and very knowledgeable. I won't buy anywhere else.
Thanks, Geoff! :-)
Love the example at the end. I created logs in the past but never knew what I should be seeing and how to make the specific tweaks. Any time you want to explain data logs and actions. I'm all eyeballs!
Thanks for the kind words. I'm glad this approach worked for you. I hope to do more articles similar to this so stay tuned!
Great article. Any tips or info on cold starts? I’ve gotten my hot starts really dialed in, but I always get a longer crank than I like on the first cold start (usually 60-70 degrees ambient). Probably 3-4 seconds, and rich after it does fire. If I let it prime twice, it starts much faster.
Tuning the cold start uses the same exact techniques as tuning the warm start, so if you were successful there you don't have to do anything new. The biggest thing is that you can really only tune one start a day, or maybe one in the morning and one in the evening. Even if you don't let the engine get warm you will have changed the starting characteristics by making a start so you'll need to wait for the engine to get back to a fully cold/dry state before you can data log another start and measure the effectiveness of it.
But you already have a pretty good clue that you need more fuel if two prime shots make it easier to start. Don't change the prime shot percentage though. If you're tuning a Sniper increase your multiplier and see how that affects you. It will add fuel based on the temperature and won't affect your warm start.
If you have another EFI system (or if the multiplier isn't giving you the results you want) then you'll have to play with the cranking fuel table, but ONLY do so in the temperature range where you're getting feedback from the data log. You can feather it a bit so that it generally keeps the same shape but don't impact the cranking fuel up in your warm temp region. You have that where you want it.
Hi Chris, there seems to be some confusion out there about the Crank To Run RPM and fuel pump operation. Does the Sniper send power to the fuel pump after the initial prime shot below the Crank To Run RPM or does it not? Some are saying that it will send power to the pump with any detectable RPM signal after the initial prime shot and some say it has to hit the Crank To Run first... Thank you for your insight!
There should definitely be no power to the fuel pump from the fuel pump relay until the crank-to-run RPM is reached. Anything else would be a big safety no-no. That's what the fuel prime is all about. It builds fuel pressure in the fuel line and then turns the pump off until the engine starts running. That should be adequate to get the engine running. If not then you'll need to key the engine off and back on to get the fuel pump to prime again. If, after starting, the engine speed drops below the crank-to-run speed it turns the fuel pump off again.
Happy New Year! Another great dissertation. My situation, although related to start up, is somewhat different. Getting the engine running was never a problem. Getting it smoothly to operating temperature was. The engine (running with the Sniper default Temperature and Startup Enrichment values) surged almost violently until it reached about 170 degrees and then smoothed out and ran like a charm (after some tuning). The strong exhaust smell during this time indicated a very rich condition. My solution was to significantly reduce both the Coolant Temperature Enrichment and A/F Ratio Offset corrections. The Coolant Temperature starts at 106% and decays to 100% at 160 degrees. The A/F Ratio starts at -1.0 and decays to zero at 140 degrees. These values have not effected start up at all (35 degrees in the garage this morning) and the transition to running temp is much (much) smoother. And the smell is just about gone. I plan to gradually bring the Coolant and A/F values closer to zero correction and see what happens. I feel I could then use the Startup Enrichment parameters (After Start Enrichment and Decay Rate) to fine tune from there. This is obviously an ongoing process. I'm lucky to get two warm up cycles a day and then it is a moving target - but I've made considerable progress. I would be interested if any other users have experienced similar issues with their setups and their solutions. Thank you for your ongoing support. I look forward to your opinion on this matter.
Great work! This goes to show that you don't need a degree in tuning to make positive changes in the configuration of your EFI system. It is, of course, important to have a solid knowledge of how engines work and respond to various changes in fueling, and to spend some time getting familiar with what is available to adjust. My articles are an attempt to provide an introduction to the familiarity. Great job implementing what I've written!
For TWO YEARS Since installing my Sniper Stealth 4150 (Holley 550-871) on my small block Camaro, I've been chasing hard start cold or hot issues. Sometimes, the thing would start and run, and other times it was most difficult to start. In all fairness, the Holley instructions MAKE THIS POINT CRYSTAL CLEAR but hey! Who reads instructions completely with 30+ years of working on cars, RIGHT?
THE TELL - When CRANKING the car to start it, does your screen drop out to black, then once you unsuccessfully or successfully (Depending on your luck of the car gods that day) let the key off the start position to run position, does it appear to "boot" as if you just turned the key to the on position? THAT'S A PROBLEM!
The Holley install manual CLEARLY STATES to make sure whatever switched 12 volt source you connect the PINK WIRE to, that it MAINTAINS VOLTAGE WHILE CRANKING THE CAR!! Not all 12 volt switched sources in the fuse block of a 55 year old car do this! In fact, MOST of the points on the fuse block don't do that! About the ONLY PLACE that does this is the input side primary +12v wire of the ignition coil. Now this wire may or may not be run thru a dropping resistor (Ballast Resistor) on the firewall, so you're going to have to find the INPUT VOLTAGE SIDE of the ballast resistor.
Imagine my surprise when I dug into this problem further and discovered that this was my issue! Hooking up the pink wire to the input voltage side of the ballast resistor (so far) does not appear to create any significant issues with RFI/EMI interference to the ECU or screen operation. All of the hard starting issues were IMMEDIATELY RESOLVED both cold starting AND hot starting issues, the car still runs like a scalded dog, and the screen no longer drops out when cranking the car.
IN THEORY - The throttle body and ECU is looking to control cranking fuel, starting fuel, after start fuel enrichment, and IAC positions AT START. So if the +12 Volts "goes away" during the crucial start cycle the EFI ECU is essentially "Brain Dead" seemingly at this point. So, yea it gonna ALWAYS be hard to start!
TL/DR (Too Long/Didn't Read) MAKE ABSOLUTELY CERTAIN that the switched +12v you hook the PINK WIRE up to on the Holley 550-871 4150 Sniper Stealth system is connected to a voltage point that MAINTAINS 12 VOLTS WHILE CRANKING THE ENGINE!
Not much I can add to that. Thanks, Steve!
So I don't really have a issue with cold/hot starts. I just had a question about battery voltage during cranking. When I start my car the handheld screen shows battery voltage. It reads 13+ when the pumps starts/primes, then as I crank it drops a bit to 10v ish. My screen never goes black. Is this a big issue? Should it read over 12 volts during cranking?
I don't have a firm low voltage number for the point at which the ECU and handheld display power-down and therefore can't start the engine. But I can tell you that you don't need anything close to 12 volts and have commonly seen the voltage dip to 10 volts and the system still start. At the same time, in my experience, cranking rotational speed is directly related to the time it takes to start the engine. Don't gauge the system's ability to start quickly until you've first put a full charge on the battery. There are a number of factors at play here and they all like strong voltage and fast cranking speeds.
Thanks for this great article! I will share my problem and solution.
I had right after the start a bad running engine. First thought was the after-start enrichment was not correct....AFR was pretty low, so it seems to be rich. After several datalogs, and adjustments i took a look at my timing table. The problem was in my timing table! During after start, the vacuum was so low (100 @ 500 rpm.) I had set my timing way tooo low! Setting a proper timing in this left upper corner of the timing table let my engine roar after the start like a Gorilla! Proper timing in all areas is a must for a good start.
Great job finding that, Marco. So, so true. So much of what is brought to us here as "fueling problems" turns out to be issues with timing. Keep up the good work!
Leave a Comment