Introduction
This article was originally written to describe how to improve ignition timing control on the Sniper EFI System. However, most of the information is directly applicable to Terminator X so we invite those owners to use this as well.
Note 1: This article provides guidance on changing your ignition timing. Bad things can happen if you put too much timing into an engine. The reader proceeds at his or her own peril. I would never advise anything that I felt was not in the best interest of the reader, but if you don't have a pretty solid understanding of ignition timing and the potential benefits and damages that can occur from inaccurate timing then get some good coaching before you proceed.
Note 2: If you have not used some sort of piston stop to confirm that your engine's TDC is accurately represented by the timing pointer and the mark on your harmonic balancer, then you truly have no idea what your timing is. Do THIS BEFORE PROCEEDING, and then re-confirm your distributor is set properly and that your inductive delay setting prevents any drift as the RPMs increase. Again, if what I just said isn't perfectly clear then you really should not proceed with anything written here.
Whether you are adding ignition timing control to an existing EFI setup or building a new EFI System configuration, there are two ways to set up your timing: Using the Simple method (where you specify just four different timing values and the ECU extrapolates the curve) or the two-dimensional ignition table (where 961 timing values are specified across a range of engine speeds and manifold pressures.) I want to shed a little more light on these so that you can create a better ignition tune for your Sniper or Terminator X System. I won't cover the timing retard capabilities for lanch retard, nitrous or boost. Maybe we'll cover that in a future article but for now this will get you started.
EFI Timing Control Using the Simple Ignition Type
Overview of Simple Timing Control
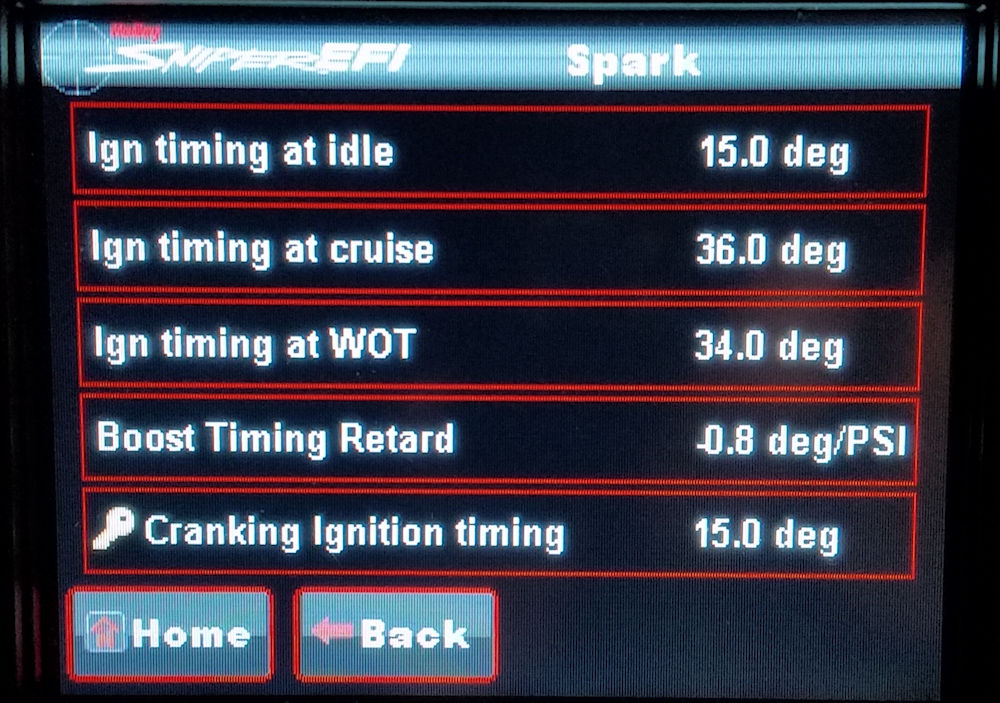
If you use the setup wizard to configure your ignition or if you are trying to use the handheld controller to modify your existing configuration to do ECU-controlled ignition timing then using the Simple ignition type is your only choice. As already mentioned, this method uses only four timing settings. These four settings are intended to mimic the action of a traditional distributor, with it's vacuum and mechanical advance. The four settings are:
- Cranking Timing (replicates timing with no mechanical advance and no vacuum advance)
- Idle Timing (replicates timing with vacuum advance only)
- Cruise Timing (replicates full mechanical and vacuum advance)
- WOT Timing (replicates mechanical advance only.)
These four settings can be configured using the handheld controller by navigating to Tuning > Basic > Spark. If you are using the Sniper or Terminator X software, you will find the cranking timing in the Spark > Cranking Parameters setup window and the other four in the Spark > Base Timing Table window. An example of each is below:
Preparation for using Simple Timing Control
If you already have a working ignition on your engine and are relatively pleased with how it performs, then you can use a timing light to determine the four settings you'd want to use now that you are implenting ECU-controlled ignition timing with your EFI System. If your harmonic balancer does not have timing marks you will need to use masking tape and a marker to put timing marks out to about 50 degrees BTDC. You can, of course, read the timing using a dial-type timing light but remember that those are notoriously inaccurate so at least calibrate it before choosing this method. Start the engine and bring it up to normal operating temperature before proceeding.
Step 1: Disconnect the vacuum line from your existing distributor and plug it with a golf tee or appropriately-sized screw to avoid a vacuum leak. Read the timing. Use this for your cranking timing.
Step 2: Replace the vacuum line to the distributor and check the timing again. Use this number for your idle timing.
Step 3: Rev the engine as you watch the timing advance under the timing light. Note the RPM at which it advances no further. Read the timing at this point. Use this for the cruise timing.
Step 4: Again plug the vacuum advance and repeat step 3. Use this number for your WOT timing. Finish by replacing the vacuum line.
Applying the Simple Timing Settings
If you have an existing configuration then the easiest method is to just use your handheld and navigate to Tuning > Basic > Spark and enter the four values. If you run the setup wizard then it will ask for your WOT timing value, but will set the idle and cruise timing at 15 and 36 degrees, respectively, so you are still going to have to go in and manually change the values. In either case you are going to have to make other configuration changes to move from your original distributor to the distributor you are using for ECU-controlled timing. Several good videos are embedded on our Distributors Page to help with that.
The resulting timing won't be exactly like your existing distributor but this will get you in the ballpark. And if the numbers are not the same as the 15-, 15-, 36-, and 32-degrees that the Sniper and Terminator X setup wizard uses as default then it is entirely likely that the numbers you transfer from your existing ignition will be much more effective for your particular engine.
Sniper / Terminator X Timing Control Using the 2D Table Ignition Type
Overview of 2D Timing Control
To configure the 2D Table ignition type you must download the Sniper or Terminator X Software. This is a free download and runs on any Microsoft Windows-based PC. There have been a few versions of this software released and different versions work with different versions of the Sniper ECU and handheld firmware. If you download the software and have any issues then it might be helpful to read the article I wrote on Sniper Firmware Versions & Updating.
Once you have the Software installed, go ahead and run it. You need to open your configuration file using this software. You can use your handheld display and download that to the SD card and move that to your PC and click "Open Config File" to open it in the software. Or, if you have a CAN-to-USB harness, you can attach your PC to your Sniper or Terminator X EFI System, start the software, and click the "Download From ECU" button that pops up when you open the software. If this is all a mystery to you then you are probably going to need to do a little practice downloading and opening configuration files before you proceed with trying to set up 2D ignition tables. Consult whomever sold you your system--they should provide this sort of support, right? :-)
(Instructions Continues Below...)

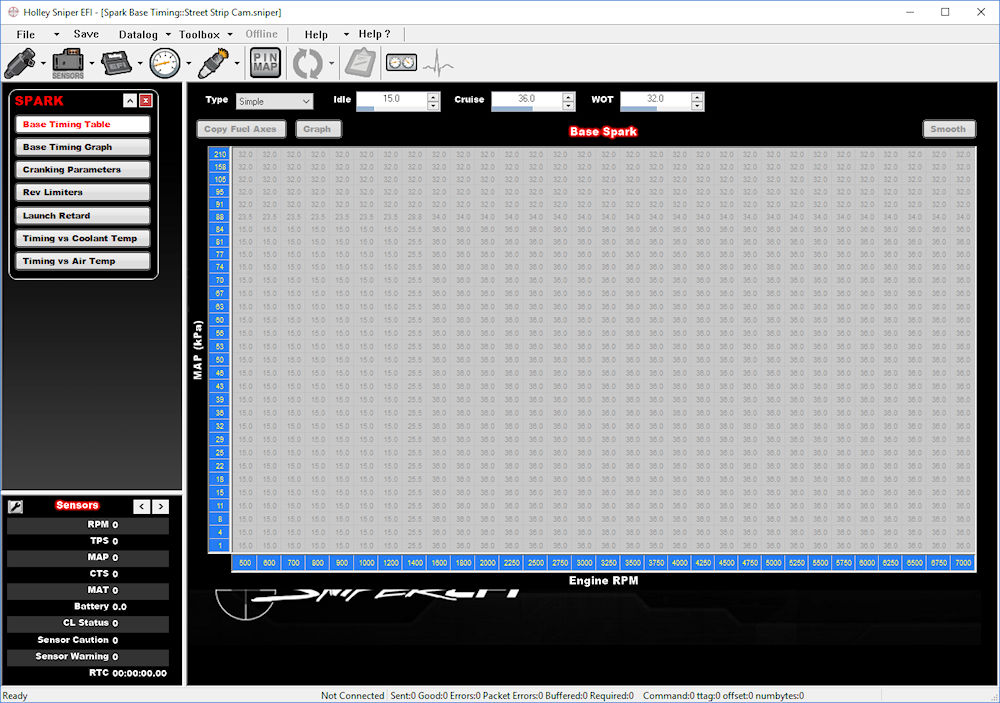
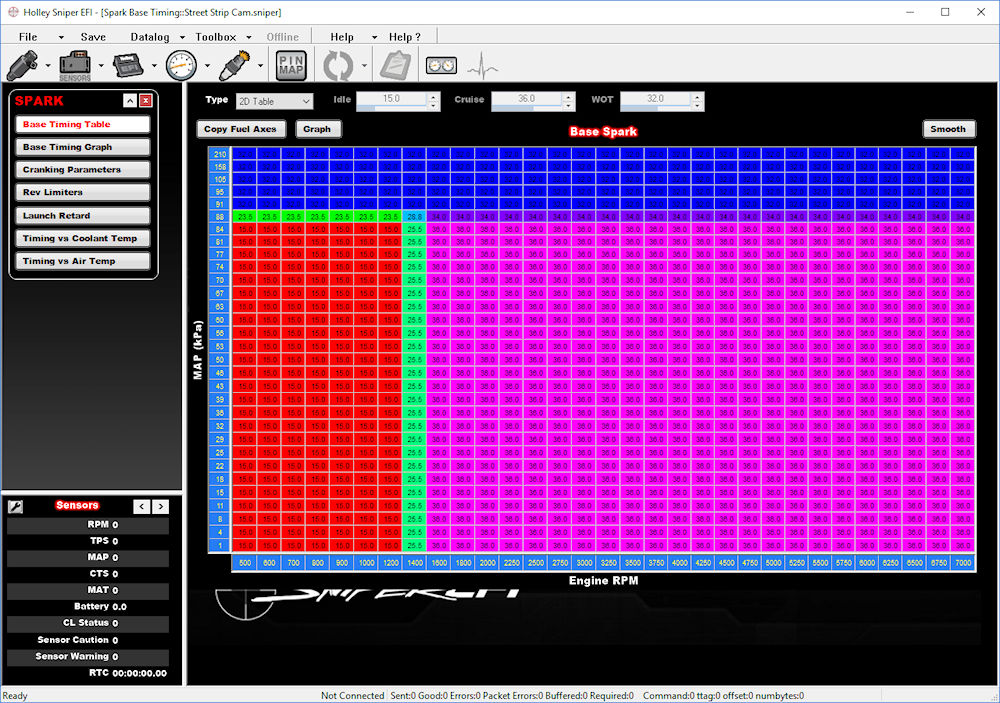
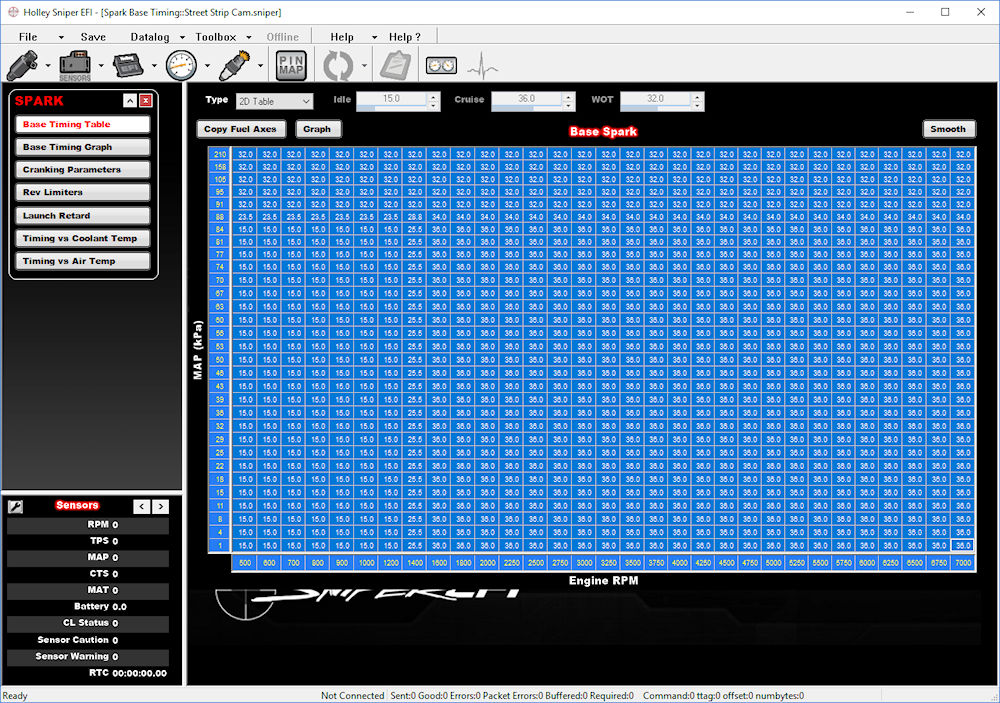
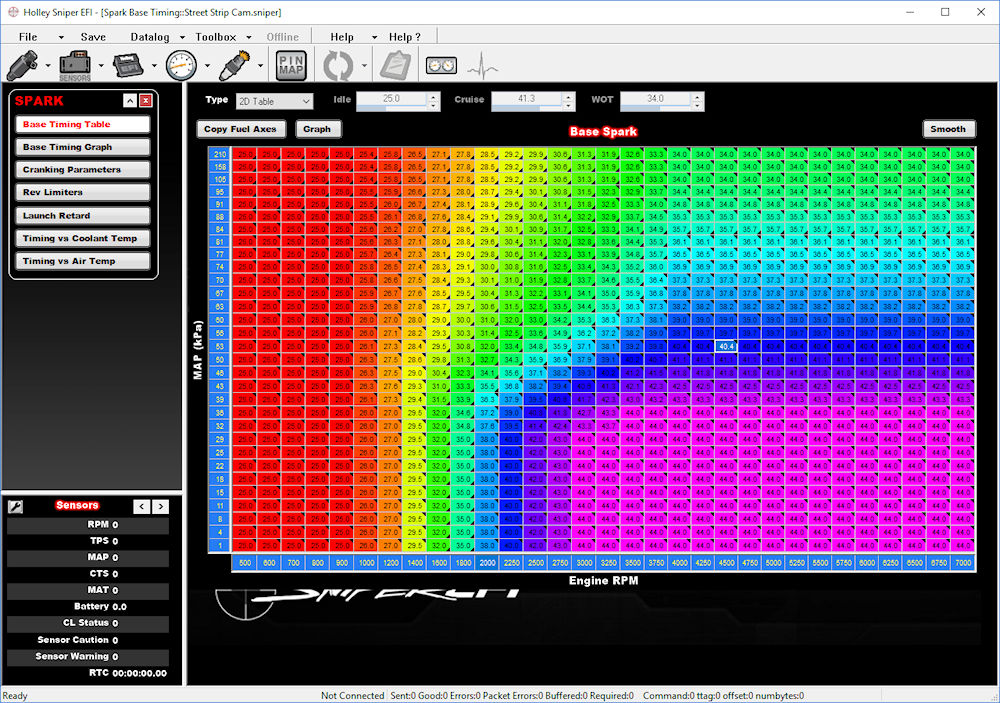
The first time you navigate in the software to the Spark > Base Timing Table configuration window you will see that the type is set to "Simple". If you change the type to "2D Table" you will see a big 31x31 ignition timing table appear in full color (see image below/left.) A horizontal axis at the bottom of the table shows you the RPM values for each column, and a vertical axis at the left of the table shows the MAP values for each row.
Two important points. First, by changing from "Simple" to "2D Table" mode and saving the configuration back to your ECU, you have effectively done nothing to your timing. In reality, the ECU consults this 2D table even when the "Simple" type is selected. The only difference is that you are now able to see and edit it in the 2D mode.
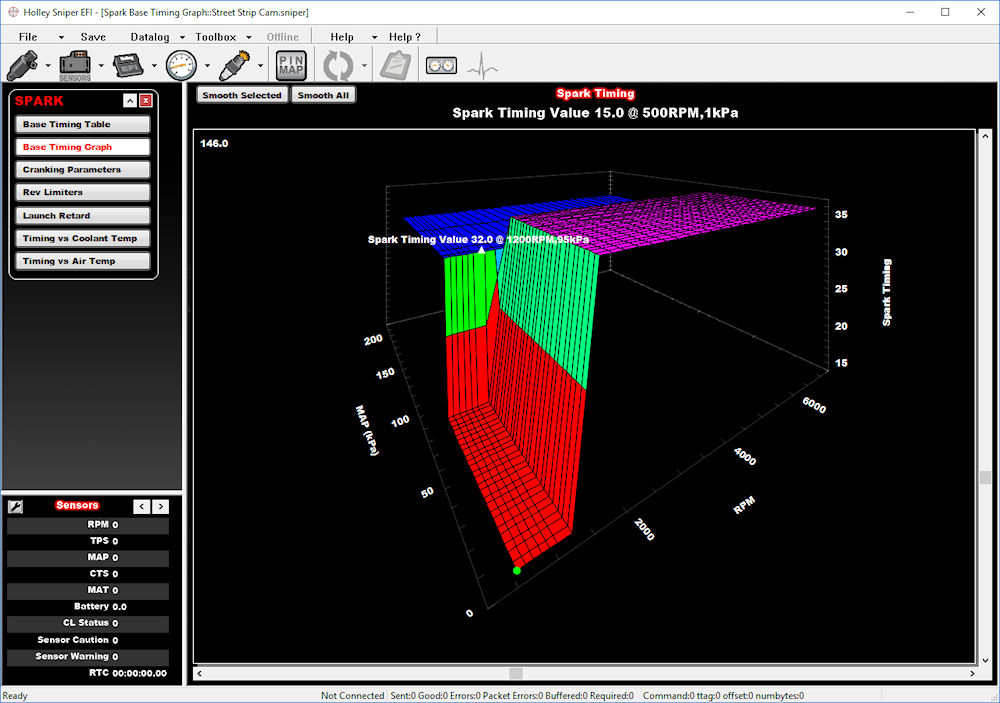
The second thing you will note are the very sharp edges in the table, and they are even more apparent if you go to the Base Timing Graph window (see image below/right.) While this Simple timing method does work, I have found that when customers have issues with their EFI Systems that affect performance they very often occur right at these harsh transitions. Not good. But there are a couple of ways to improve this.
Before you proceed with any changes note that going back is not so simple (no pun intended.) If you make edits to the 2D table then the software makes an effort to re-create this in the idle, cruise, and WOT timing values in the Simple type. Obviously, that's kind of impossible so it just takes a stab at it. If you change back to Simple, no changes are made to the 2D table at all. But if you then try to change the simple timing values back where they were, the software takes a stab at recreating those changes in the 2D table--but that doesn't work either. So unless you create a backup (HIGHLY RECOMMENDED) you are going to go through some misery trying to get your timing table back where it used to be if that becomes necessary.
A Quick, Simple Method of Updating the 2D Timing Table
An overly simple way to get rid of the harsh edges in your Simple timing table is to change to 2D table type, select all of the cells in the table (left-click in the top-left corner of the table and drag down to the bottom-right corner) and click the Smooth button a few times. And I've had a few customers who have achieved some level of success with this method. But I would suggest there is a better way.
A Better Method of Updating the 2D Timing Table
I know that your high school teacher told you that plagiarism (copying someone elses work) is a bad thing. And in most contexts that is absolutely correct. But when it comes to EFI system tuning I like to point out that imitation is the most sincere form of flattery. And Holley has provided some ignition tables that are far superior to what they offer in the Sniper and Terminator X EFI System via the "Simple" method. Here's how:
Step 1: Find a good source ignition timing table (also called a map.) If you are running the Sniper software then unfortunately there are no candidates for a good 2-dimensional ignition timing table included in that software. But in the Terminator X software are included quite a few good candidates. Sniper users can install the Terminator X software and use one of these.
Let's say you have a naturally aspirated small block Chevrolet. Open the Terminator X Software, navigate to File > Open Global File, and click on Base Cals. Note the warning that pops up. This is not to be ignored. Simply copying and pasting from these base cals can result in configurations that are hazardous to your engine. We're going to talk through some of these hazards but ultimately it is YOU that is responsible for loading a safe configuration into your ECU. If you're not sure, request some help. If you bought your EFI system from us, that help is a phone call, text, or email away. :-)
Once in the Terminator X base cals you will see categories for TBI, Hemi, GM and Ford. Others may be added in future releases. Continuing with our example, we'd navigate to GM and then to Small Block. Several configurations are offered. Since we're looking for a timing table for a naturally aspirated engine we'll choose one that doesn't use "Supercharged" or "Turbo" in the name. Clicking on that opens the source configuration. Navigate to the "Spark" map (look for the spark plug icon.)
Step 2: Open your current configuration. If you are running a Sniper EFI System then you'll need to open your configuration in the Sniper software. If you're running a Terminator X EFI System, then use that software. Again, navigate to the "Spark" map. Sniper users will may need to click the "Enable Large Table" box if a smaller 16x16-cell map is presented rather than the larger 31x31-cell map.
Step 3: Note the Y-axis (MAP/left side axis) on your current configuration. This is a critical step. All of the default Sniper configurations go up to 210 kPa, reflecting the fact that they have a 2-Bar MAP sensor. Unless specifically built for a supercharged or turbo application, the Y-Axis on all of the Terminator X configurations only goes to 105 kPa, reflecting the presence of the 1-bar onboard MAP sensor. In this example, since we are dealing with a naturally aspirated engine, the extra two rows at the top of our Sniper ignition table have no value. You can simply copy the Y-Axis from the Terminator X ignition table and paste it into the Y-Axis of your Sniper configuration. Terminator X users will not generally need to do anything other than confirm that the Y-Axis of their current configuration matches the Y-Axis of the source configuration.
Step 4: Note the X-axis (RPM/bottom axis) on your current configuration. In most cases the X-Axis in your current configuration is going to be the same as the ones in the base calibrations--unless you've selected "Race Cam" when you ran your setup wizard. In that case the X-Axis shifts left a bit, losing resolution in the low-RPM range and adding an extra 1000 rpm at the top. If this is you then you're going to have to make some adjustments to either the X-Axis or the timing table itself. This is left as an exercise to the reader. :-)
Step 5: Now that you have confirmed a correct alignment of both axis, cut-and-paste the body of the table from the source map into the ignition timing map of your configuration. The easiest way to do this is to simply select any cell in the source map and press Control-A to select them all. Pressing Control-C will copy them (or you can right-click and then click "Copy". Now go to your configuration and select the top-left cell (only!) Press Control-V to paste the entire map that you copied from the source configuration into your configuration. Done!
Step 6: Save your newly modified configuration file with a new name. You can move this file back to your ECU (either with the SD card or by simply syncing it with the ECU if you are connected using the CAN Bus to USB adapter harness. Cycle power and you're ready to give it a try. You can always go back to your earlier configuration if this doesn't work for you.
Going Further
If this worked for you and you would like to further enhance your system's ability let me suggest that you take the same approach to improving your target AFR table. Just as the Sniper / Terminator X setup wizard uses a Simple idle/cruise/WOT method of setting ignition timing it also uses the same simple method of setting the Target AFR. Again, a far improved solution is available in the base tunes available in the Terminator X software. And since the timing and air-fuel ratios work hand-in-hand you will find even more improvement by moving both of these to the 2D method over moving either one individually. Enjoy!
Conclusion
I hope that you have found this useful. If you try any of these techniques please post a comment below and let everyone know how it works out for you. Or, if you have a specific question, I'd be happy to answer that as well. Would you like to be notified when a new article is posted to EFI Pro Hangout? It's easy: Join Chris's mailing list. Don't worry about an avalanche of email to your in-box, just the occasional article notification, pertinent new product or feature announcement, or info relevant to EFI. Join us!
 +
+ +
+ +
+ +
+


9 Comment(s)
Great write up! I actually did the same thing. So one thing I noticed and would like to point out before everyone just does a copy and paste is if you run the wizard the resolution in the timing tables don't line up and the numbers will be skewed.
For example if you run the wizard for a SBC 350 using stock or street strip your timing table will start out at 20-105 KPA, But the timing table we are supposed to copy paste from the EFI V4 is 1-210 KPA. So BEWARE before you copy paste.
So a few ways to fix this is to just run the wizard as race then copy paste your VE and the EFI V4 timing TBI table to your tune. For some reason the table resolution is 1-210 if you run the race cam, but on stock or street strip it's 20-105. You can also just add the tables from the EFI V4 software directory to the sniper efi software directory, Then you could just add the proper tables by clicking Toolbox / Individual Config / Spark / 25 degrees idle 34 WOT.spark
Great info here--thanks for sharing! When creating these articles I try to create something that straddles the sometimes-wide gap between being readable by the majority of users while still being technically complete. I recognized that there are differences between the scaling and started to mention this but since the article was already rather long and tedious I deferred. I'm so glad you did though.
That's a great idea that I didn't have before about simply dragging the individual configuration files over from the V4 software into the Sniper directory. I'm sure a lot of advanced users will appreciate that capability.
Is it possible to just copy and paste the entire table including x &y axis, or just change the values to match? what issue's could be caused if done this way?
Sadly, the software does not allow cut-and-paste of the either entire axis. But that is not necessary, nor would it be advised unless you also did the same to all tables that use the same axis. Instead, use the axis you have and adjust the placement of the table to be consistent with that provided in the donor tune. In other words, if the tune from which you're borrowing starts increasing idle at 1000 RPM, copy and paste the table you borrow to do the same.
Hi Chris--thanks for this info. Like TBone said, the 2 different tables don't line up properly. I saved both tables to an Excel spreadsheet to compare. 210kpa is for +15psi boost for turbo setup. I don't think it would make a great deal of difference on a NA engine, as it would never get to this pressure, but I didn't do it that way anyway. You really just want to get rid of those sudden transitions.
I had great success by just changing a few numbers in the table at appropriate cells to suit my vehicle setup, and just using the smooth button a couple of times. (You can do the same to smooth out the the base fuel table and graph.) Save your changes back to the SD card, re-install SD into the 3" display and upload to the EFI...Easy. And works extremely well. By doing this, (and implementing progressive throttle response), the car is a pleasure to drive now.
Australian RHD 1982 Chev Corvette Collector edition :-)
Thanks for sharing!
I assume you select all the cells and adjust them down (using the arrow keys) to where they are suppose to be after making this change?
In my experience the results provided by the ignition configuration that results from the steps above is generally a huge improvement over what is provided by the setup wizard. Further tweaking may be beneficial (or even necessary) if your particular engine wants signiticantly more or less timing. I would start with what results from the instructions above and then if you feel or later find that adjustments are necessary then there are several ways to adjust the table. As you suggest, one can adjust every cell simultaneously by selecting all of the cells and using the CTRL and arrow keys. (CTRL Up-Arrow or Down-Arrow increases or decreases 1 percent; CTRL Right-Arrow or Left-Arrow increases or decreases 5 percent.).
The new Holley Sniper EFI tuning software seems to go up to 200+ kpa. would I then ignore what was said about adjusting the v4 software to correctly overlay? Also, since v5 software is out, is that the software you would use now instead?
The values in the X- and Y- axis of any of the tables can be changed. Though it is generally best not to change them, if that becomes necessary then they should be adjusted to the engine's advantage. Taking the pressure range to 200 KPA is not to the advantage of a naturally aspirated engine. It is not harmful, it just goes beyond what would be a useful value for that engine.
The V4 and V5 software that is available at this point is for the HP and Dominator ECUs (including the Terminator systems.) I have not noticed any changes between V4 and V5 in the included base configurations (or the custom configurations, for that matter.) Therefore, it makes no difference which version of the HP/Dominator software from which you take the timing table. They will be the same.
Is there a video of changing ignition map of v4 to sniper so the x and y axis numbers are same? Is it easier to just change the kpa numbers manually?
I am not aware of a video but, yes, doing it manually is probably the best way. Unlike the data cells themselves, there is no way to cut-and-paste from/to the axis (at least not a way of which I am aware.) The only way to change the values is one at a tme.
What sometimes frustrates the process is that under certain conditions the Sniper software will change the values of other cells based on the value you place in a given cell. For example, if your top three cells in the Y axis are 97, 160, and 210 and you change the top cell to 105, it will average the cell between 97 and the new value of 105 to 101 (since you can't have a cell that is lower on the axis have a higher value.)
If you're going to change both the fuel and spark table axes then be smart and change the fuel first. You can then go to the spark table and click "Copy Fuel Axes"
This information was very valuable and improved my engine's performance greatly. Performance and engine operating temperature were improved. It's confusing that the Sniper ignition tuning out of the box leaves so much to be desired when such an obvious improvement is so easily available.On a tangential note, what are the thoughts on doing something similar with the Target A/F Ratio table? The Holley EFI V5 sample table is quite different than the Sniper out of the box tune.
Great observation, Kareem. That is precisely the next step one should take. I have considered adding that point to this article but feel I'm sort of pushing the technology envelope with some readers as it is. The target AFR and timing table work absolutely hand-in-hand because a leaner mixture burns much slower and needs more advance. That is why you see the big advance numbers there in the cruise section. This allows you to lean out the target AFRs in that same region and improve fuel economy.
Great info as always. I tried copying, then actually subtracting 5 degrees. But is looks like something is off. Did someone make a change to the Google sheet? The one in this link doesn't match the one in the table you have shown. It appears the values have changed from 600-900 RPM.
The image is fairly old and the improved sniper timing table in the Google Sheet is the one you should use.
Downloaded the Improved Timing Table last night on my 440 Roadrunner. I'm very pleased with the results. Performance improved and the car just runs amazing throughout the power band. The Sniper Software was a little intimidating to me at first.Save all your changes to GCF files if you make any mistakes, you can always revert back to a previous file. That is mentioned often on this site and is wise council.Thank you for the information provided on the forum, it's very helpful.
Thank you for your reply and happy it worked well for you.
The old info was correct this updated info looks as if no one actually looked at the terminator X timing table and assumed it was like the V5 table. I suppose you could set your idle timing and build timing to replicate vacuum advance and apply to the timing table in the Terminator X but that is beyond the scope of this article. Using the NA 350 for example the spark table is nothing more than stock table with 12 deg idle timing.The correct base table for a N/A 350 with a performance cam is still found in the V5 software they have removed it from the base tunes but it can still be found under toolbox ToolBox/Addconfig/Spark/ 25 Degrees Idle 34WOT.Spark Then tune to taste
Leave a Comment